Do you have lots of photos, music, and movies that you want to share with your family and friends?
Have you ever plugged a bunch of USB disks in multiple computers and yearned for an online private cloud drive?
Have you frustrated with the fact that NAS (Network Attached Storage) devices are expensive on the market?
Here, we highly recommend NAS solution—you can DIY your own NAS machine without much additional hardware and cost. That solution is a compact and convenient OpenMediaVault NAS Box based on Raspberry Pi designed for NAS beginners.
Why do we use Raspberry Pi to DIY OpenMediaVault NAS Box?
If you have a simple knowledge about Raspberry Pi, you probably know that it’s a great tool and can be used as a personal micro PC with a powerful processor, capable of performing almost everything stable within a reasonable range. Its USB3.0 features determine that It is almost the perfect choice for building a household NAS. Most importantly, it is cheaper than a completed NAS system and has a much lower energy cost.
Here I use OpenMediaVault to build my NAS system. Based on Debian Linux OS, OpenMediaVault is an open-source NAS operating system and it’s easy to update system via Debian package management. Its Raspberry Pi-specific version can be configured and managed via a Web interface to run well on Raspberry Pi.
How to do?
In this part, I would like to guide you to DIY a NAS Box.
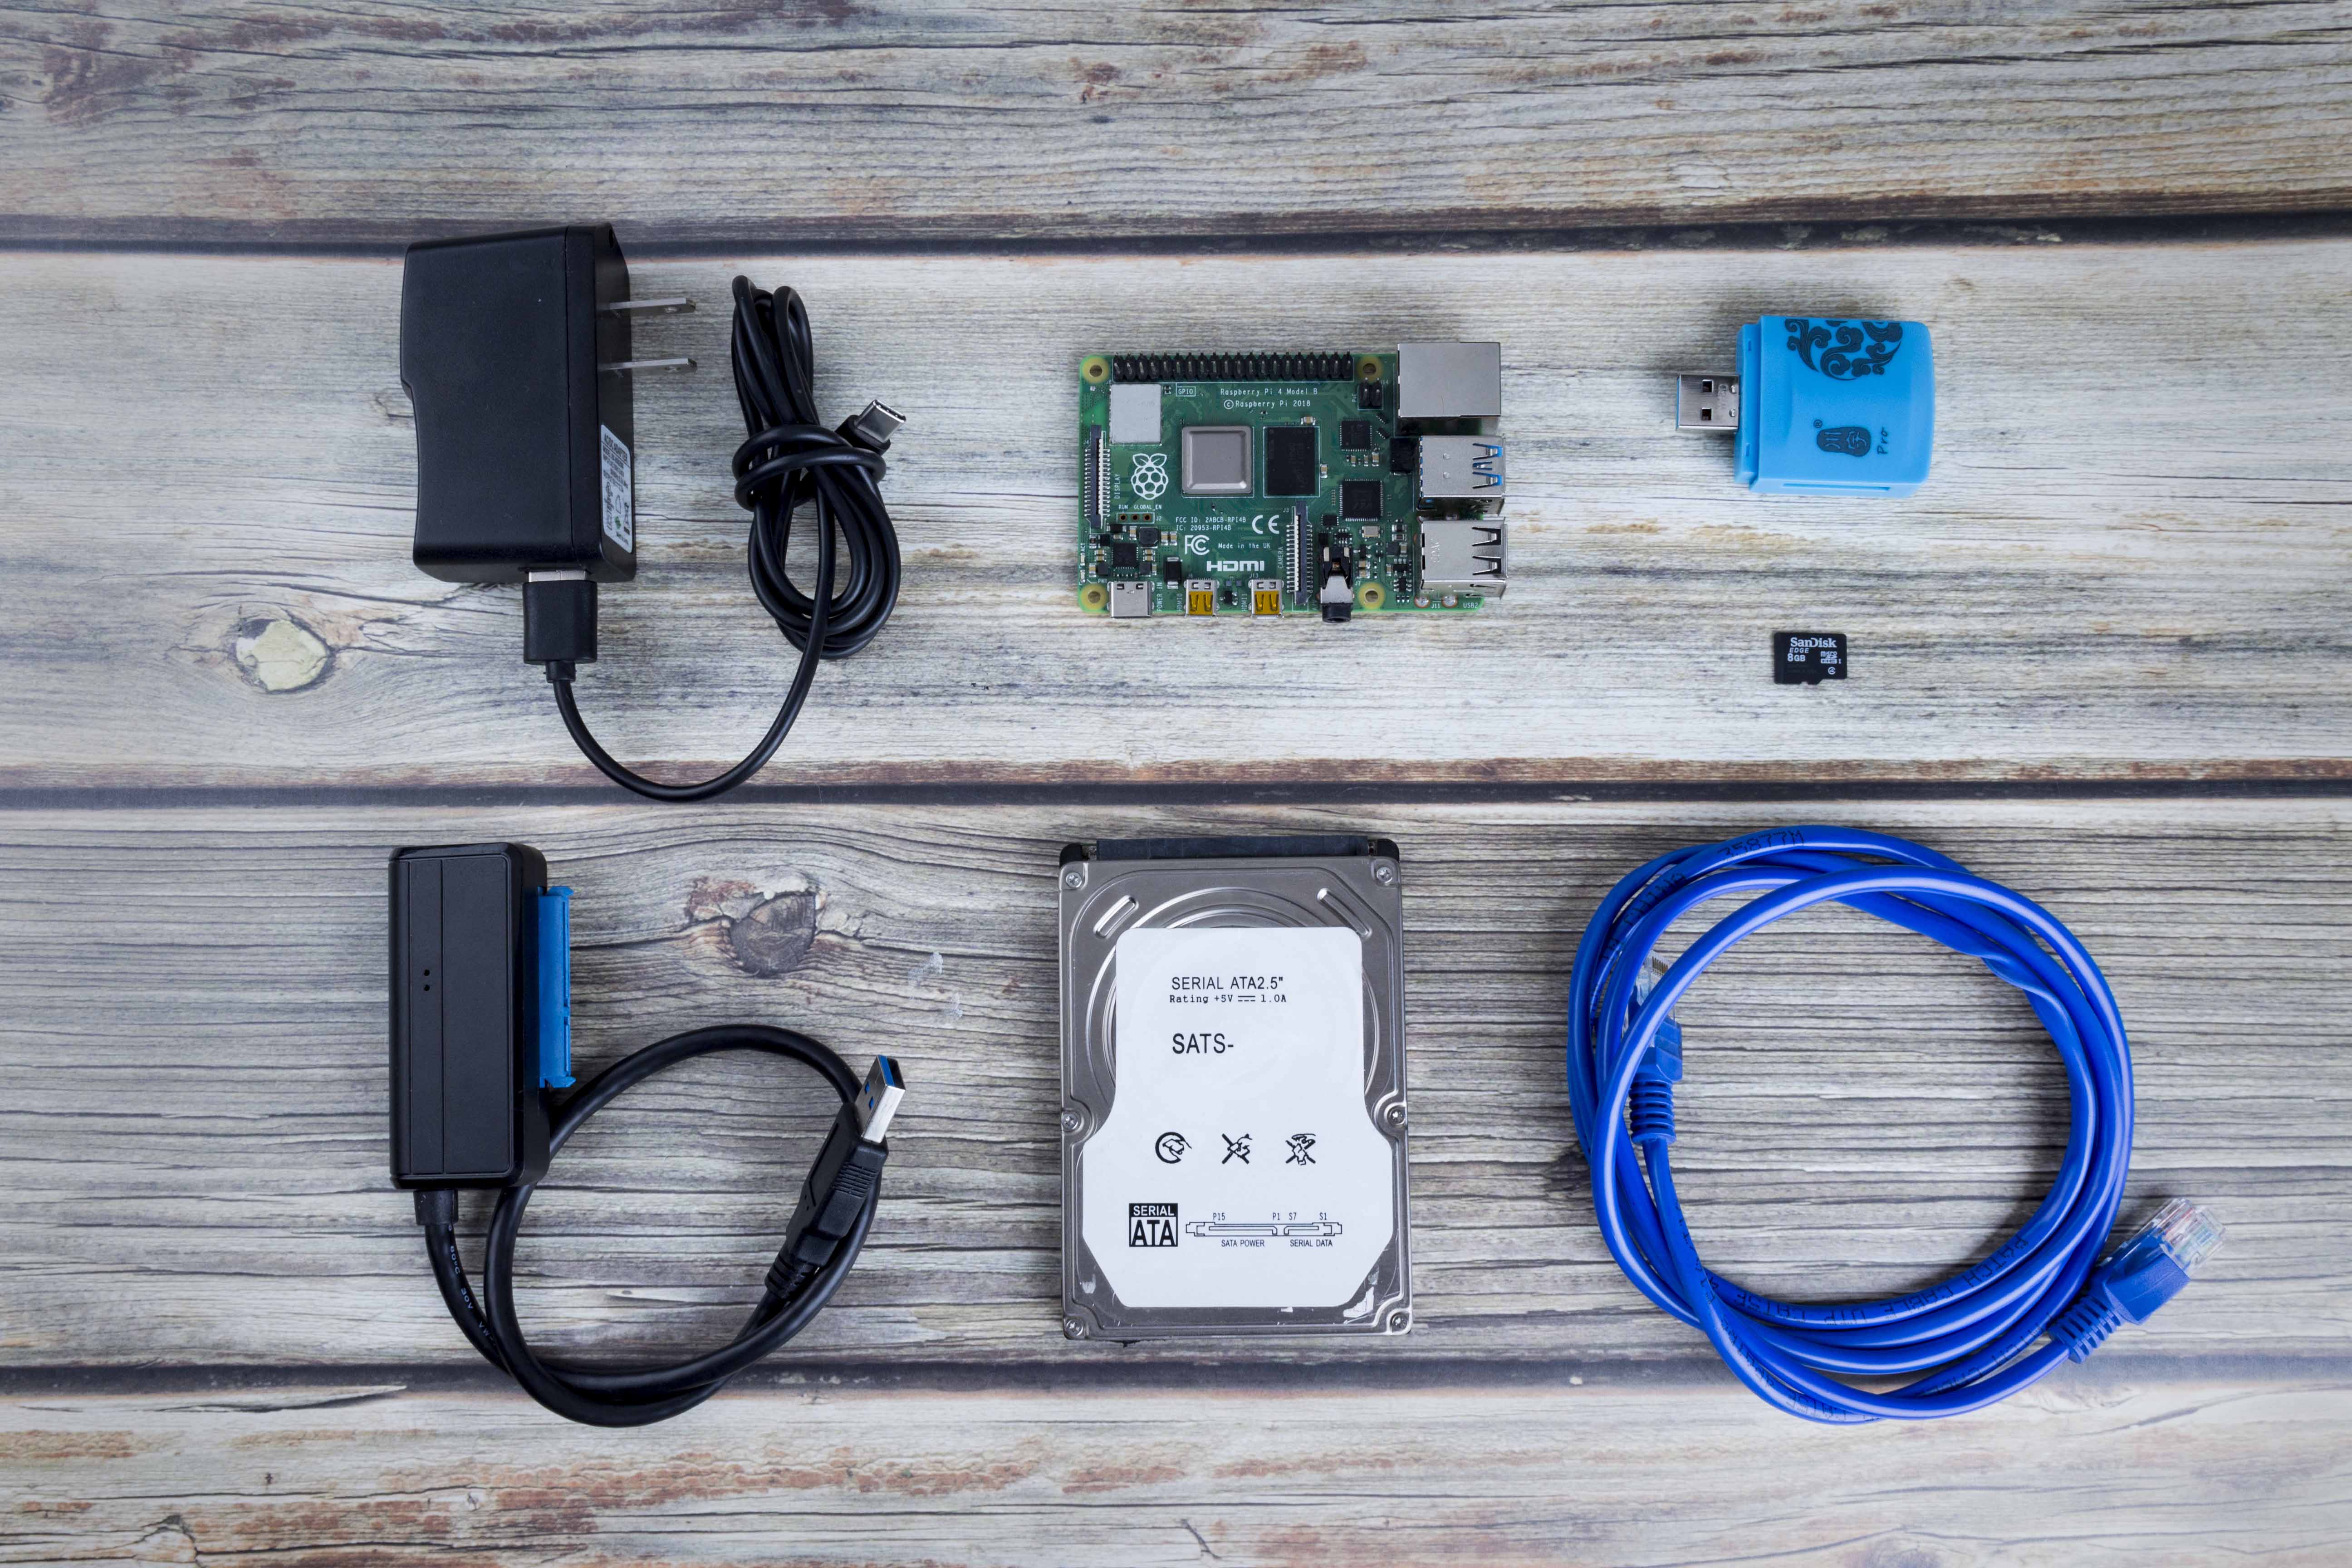
Basic components to build a Openmediavault NAS Box
To make a Raspberry Pi NAS Box, you have to prepare these parts:
- Raspberry Pi 4(the best choice).
- Raspberry Pi power supply (Official one is recommended).
- Micro SD Card and card reader for downloading OMV image.
- External USB drivers
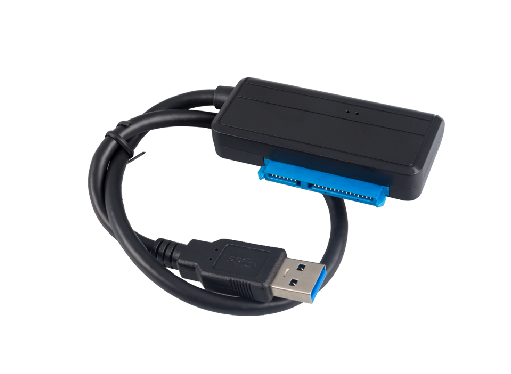
- USB3.0 to SATA cable
- Ethernet cable.
The USB 3.0 high-speed interface of Raspberry Pi 4 makes it easier to transfer data quickly. If you have Raspberry Pi 3 or 3B+, it doesn’t matter; OMV can also work stable on it.
Here I use USB3.0 to SATA cable, taking full advantages of the USB3.0 interface of Raspberry Pi 4. The USB3.0 to SATA cable can be directly connected with the 2.5-inch laptop hard drive coming with SATA interfaces (it doesn’t work on desktop hard drive). Make your laptop hard disk become a high-speed USB3.0 mobile hard drive, giving you the best experience of data transmission.
Building NAS boxes with Raspberry Pi means you need to use an external hard drive. For your data security, it’s recommended to use 2 or more than 2 external USB disks.
Upgrade Your Raspberry Pi NAS Box
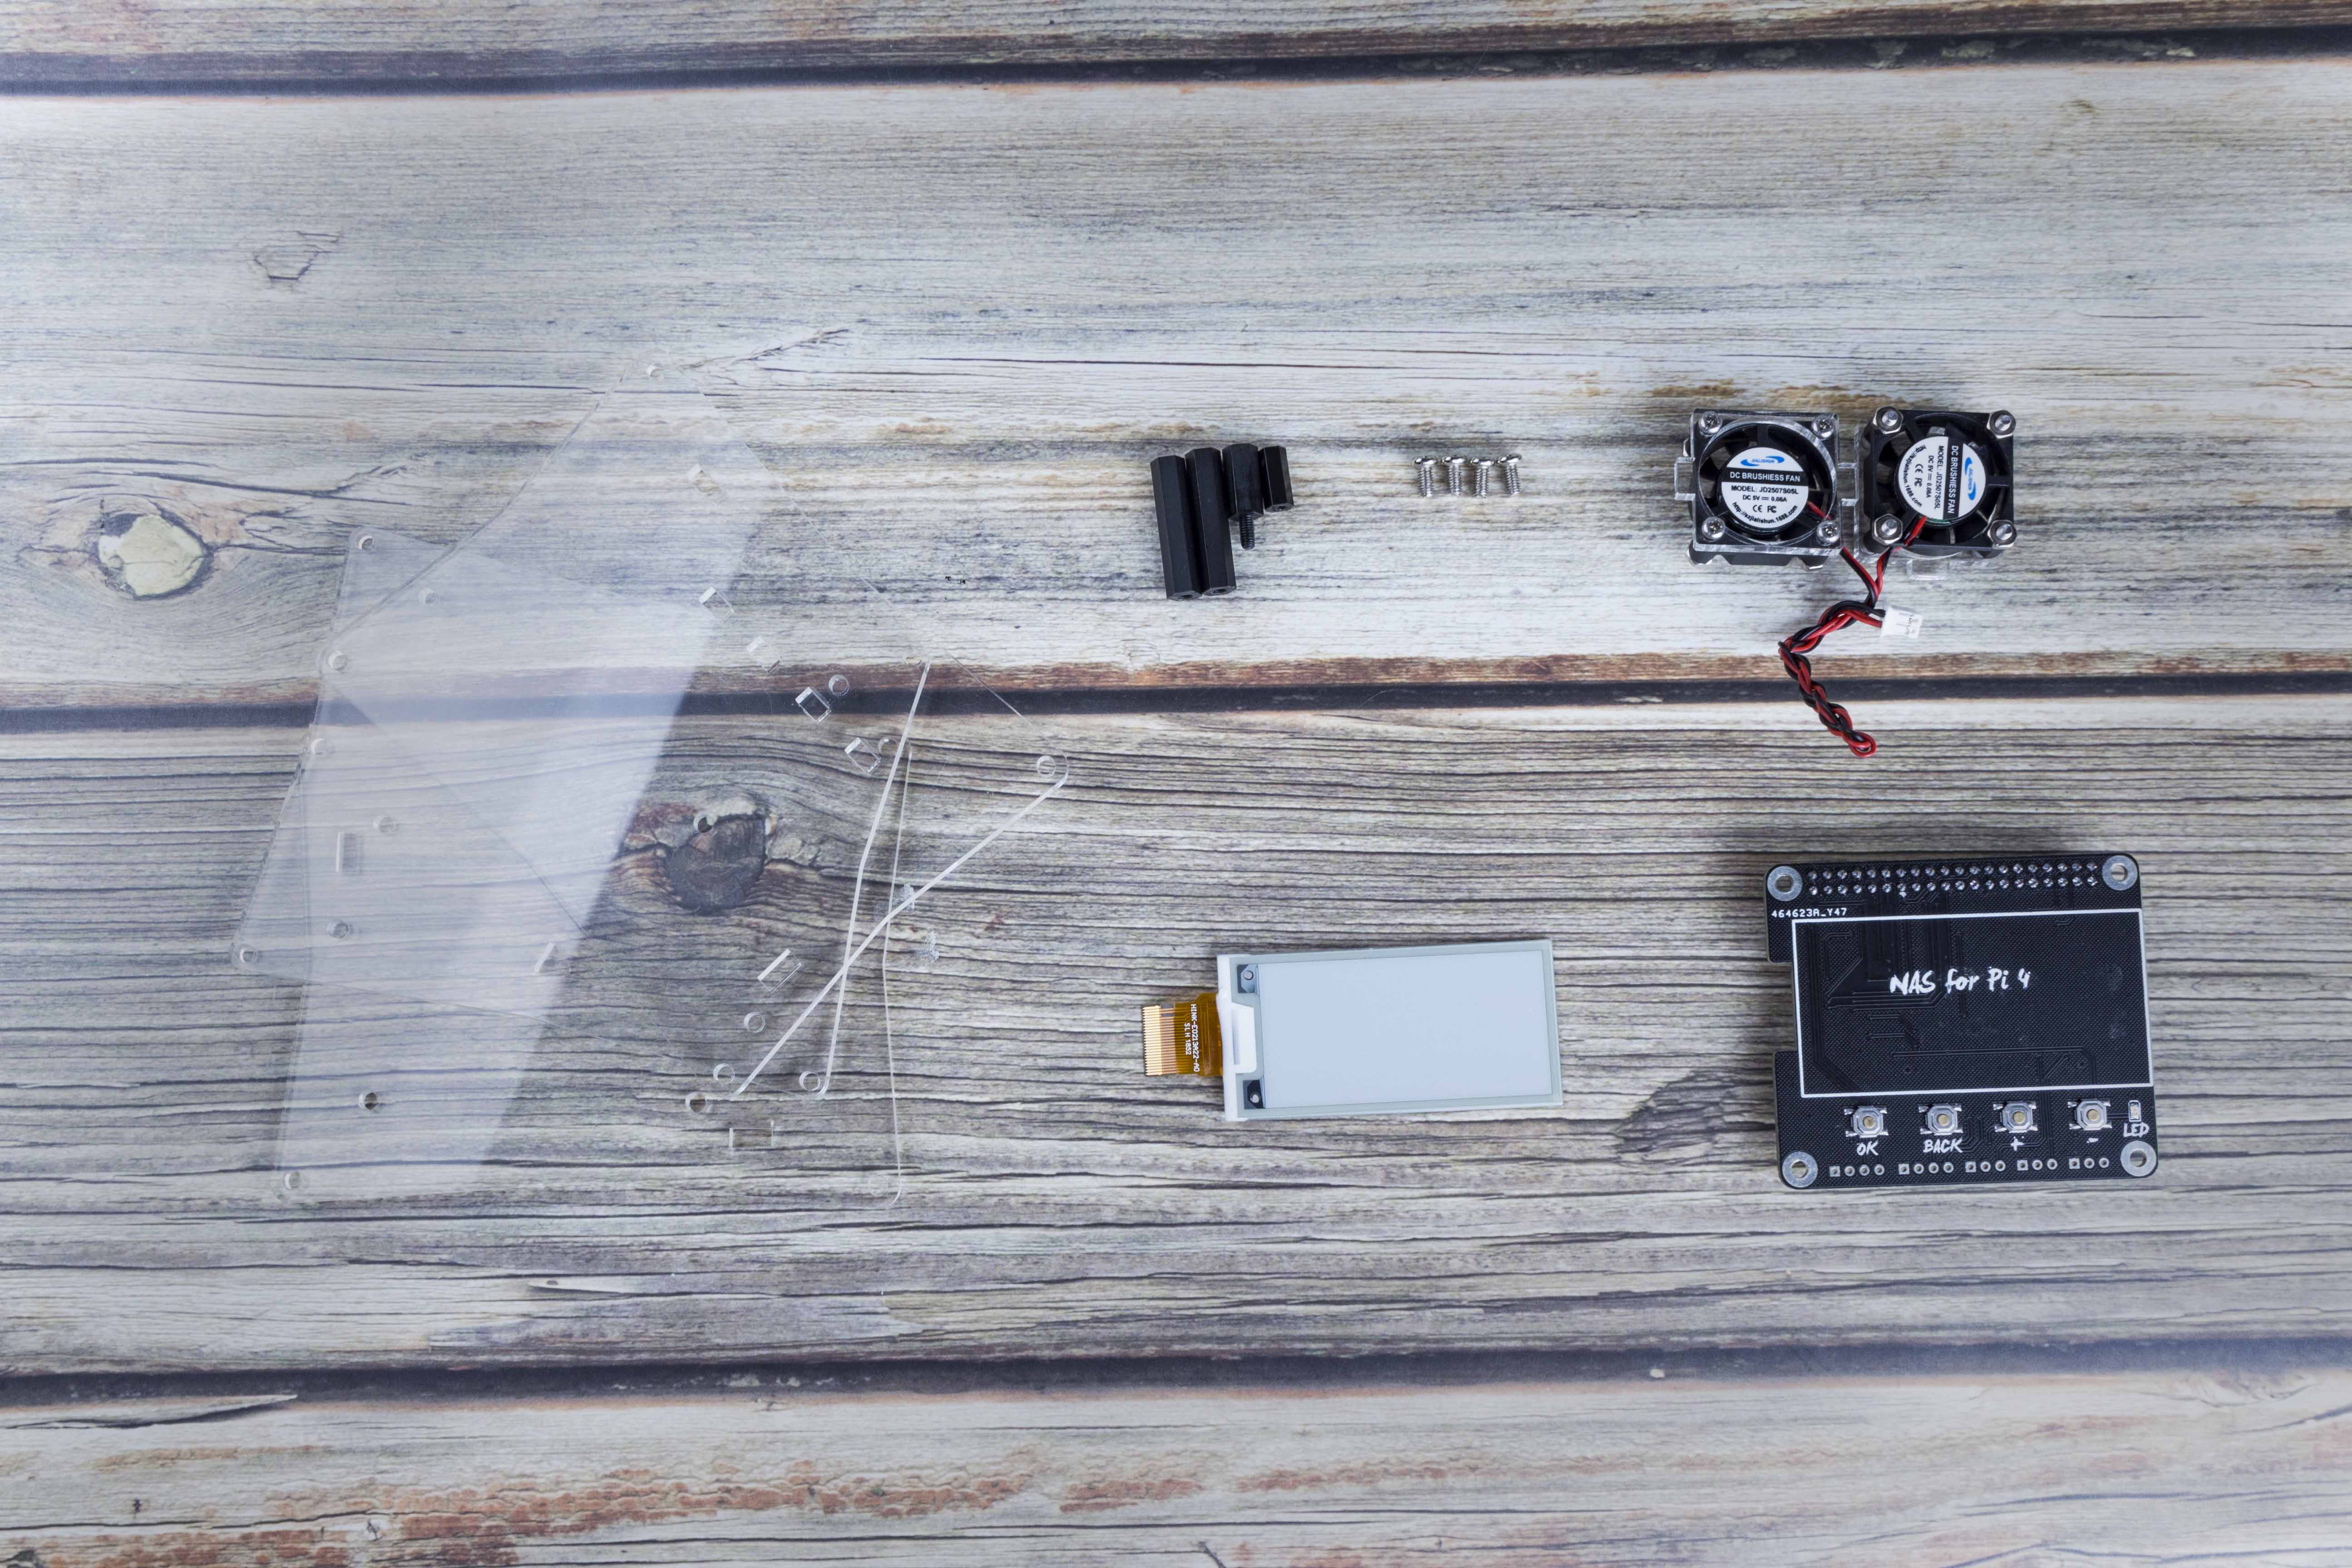
With these parts, you can build your own network-attached storage NAS. But to better manage the disk and optimize performance, I also prepare the following additional parts to DIY my NAS box:
- E-ink Screen.
- Extension Board.
- Radiator Fan.
- Protective Enclosure.
- Some Nylon standoffs and Screws
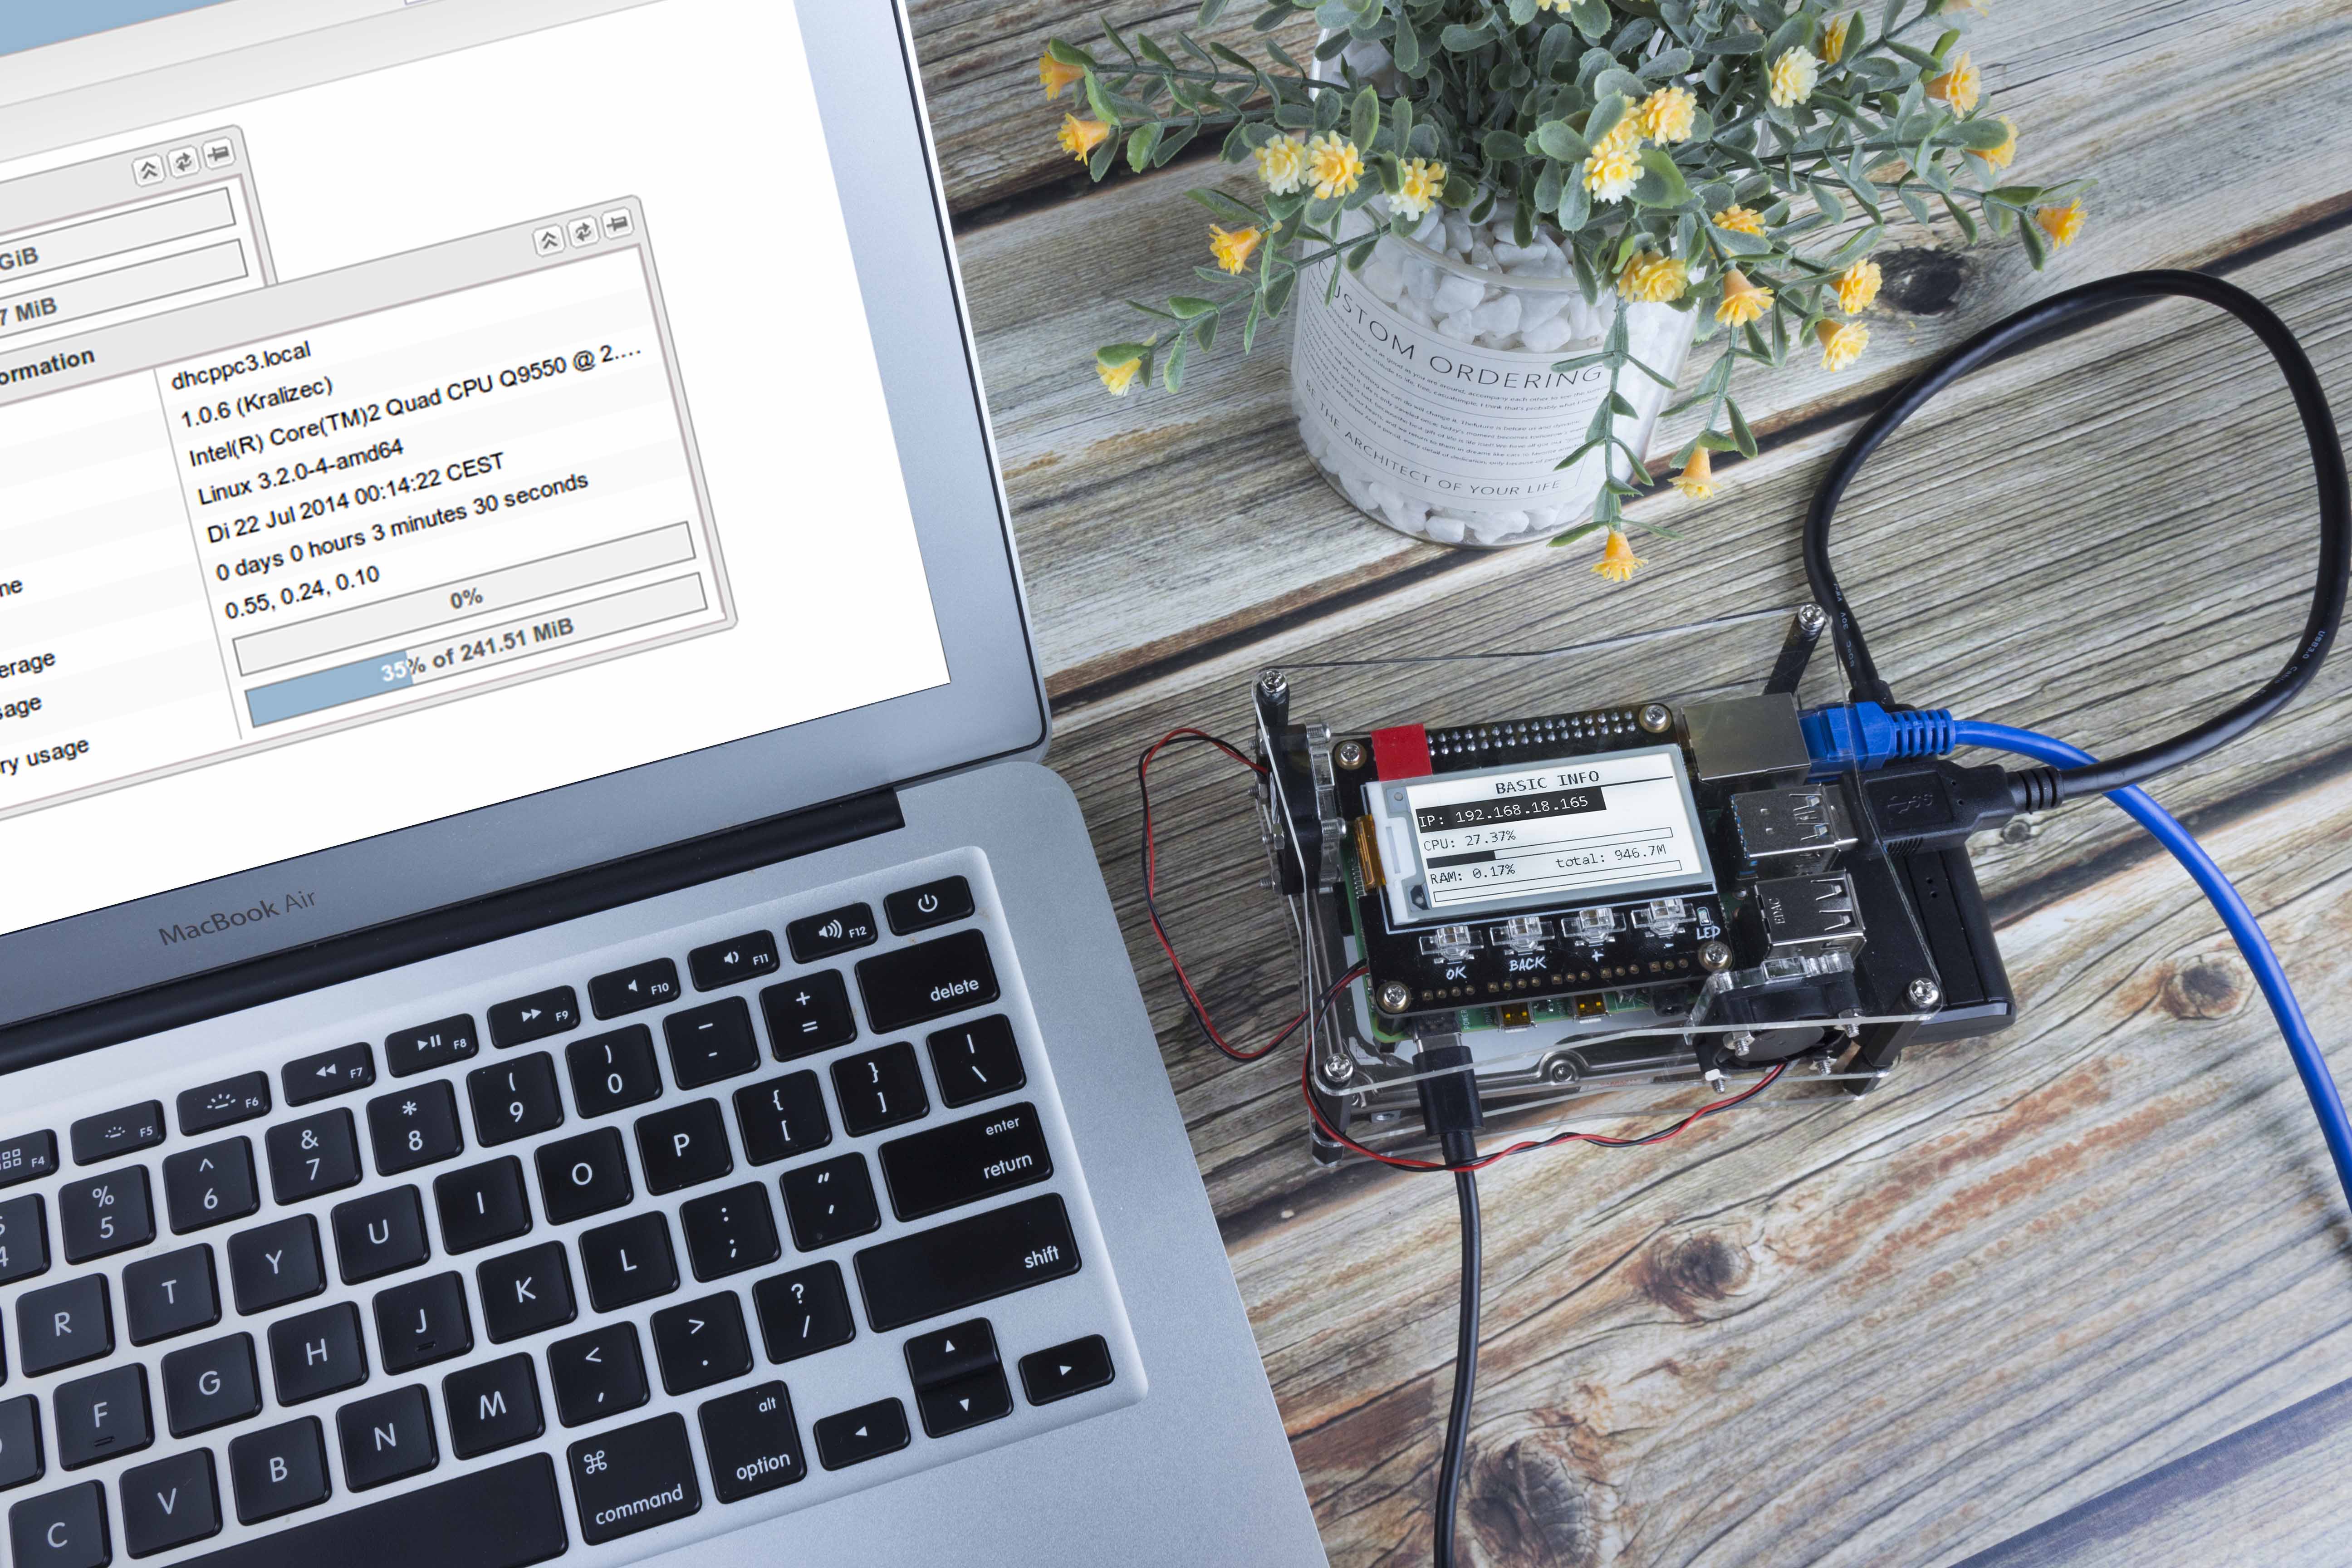
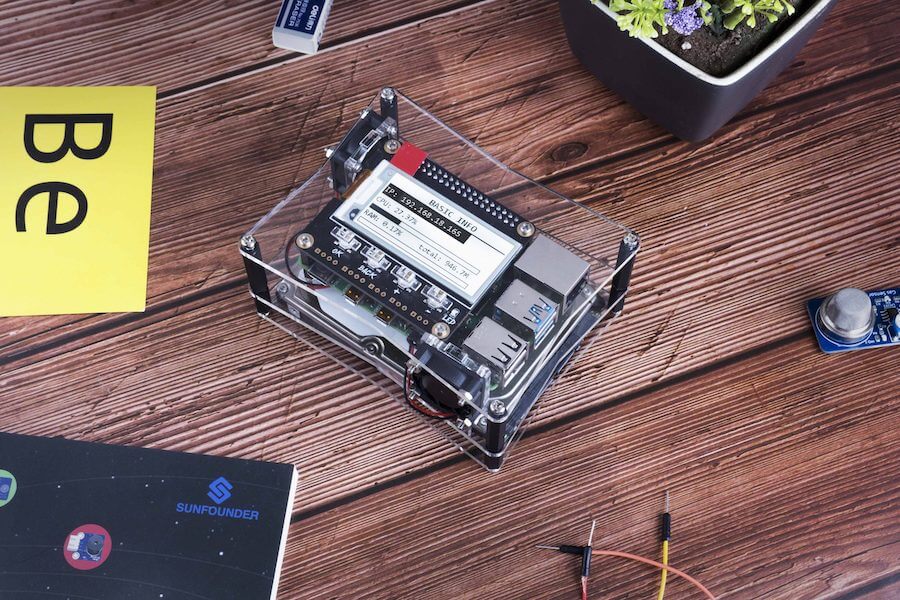
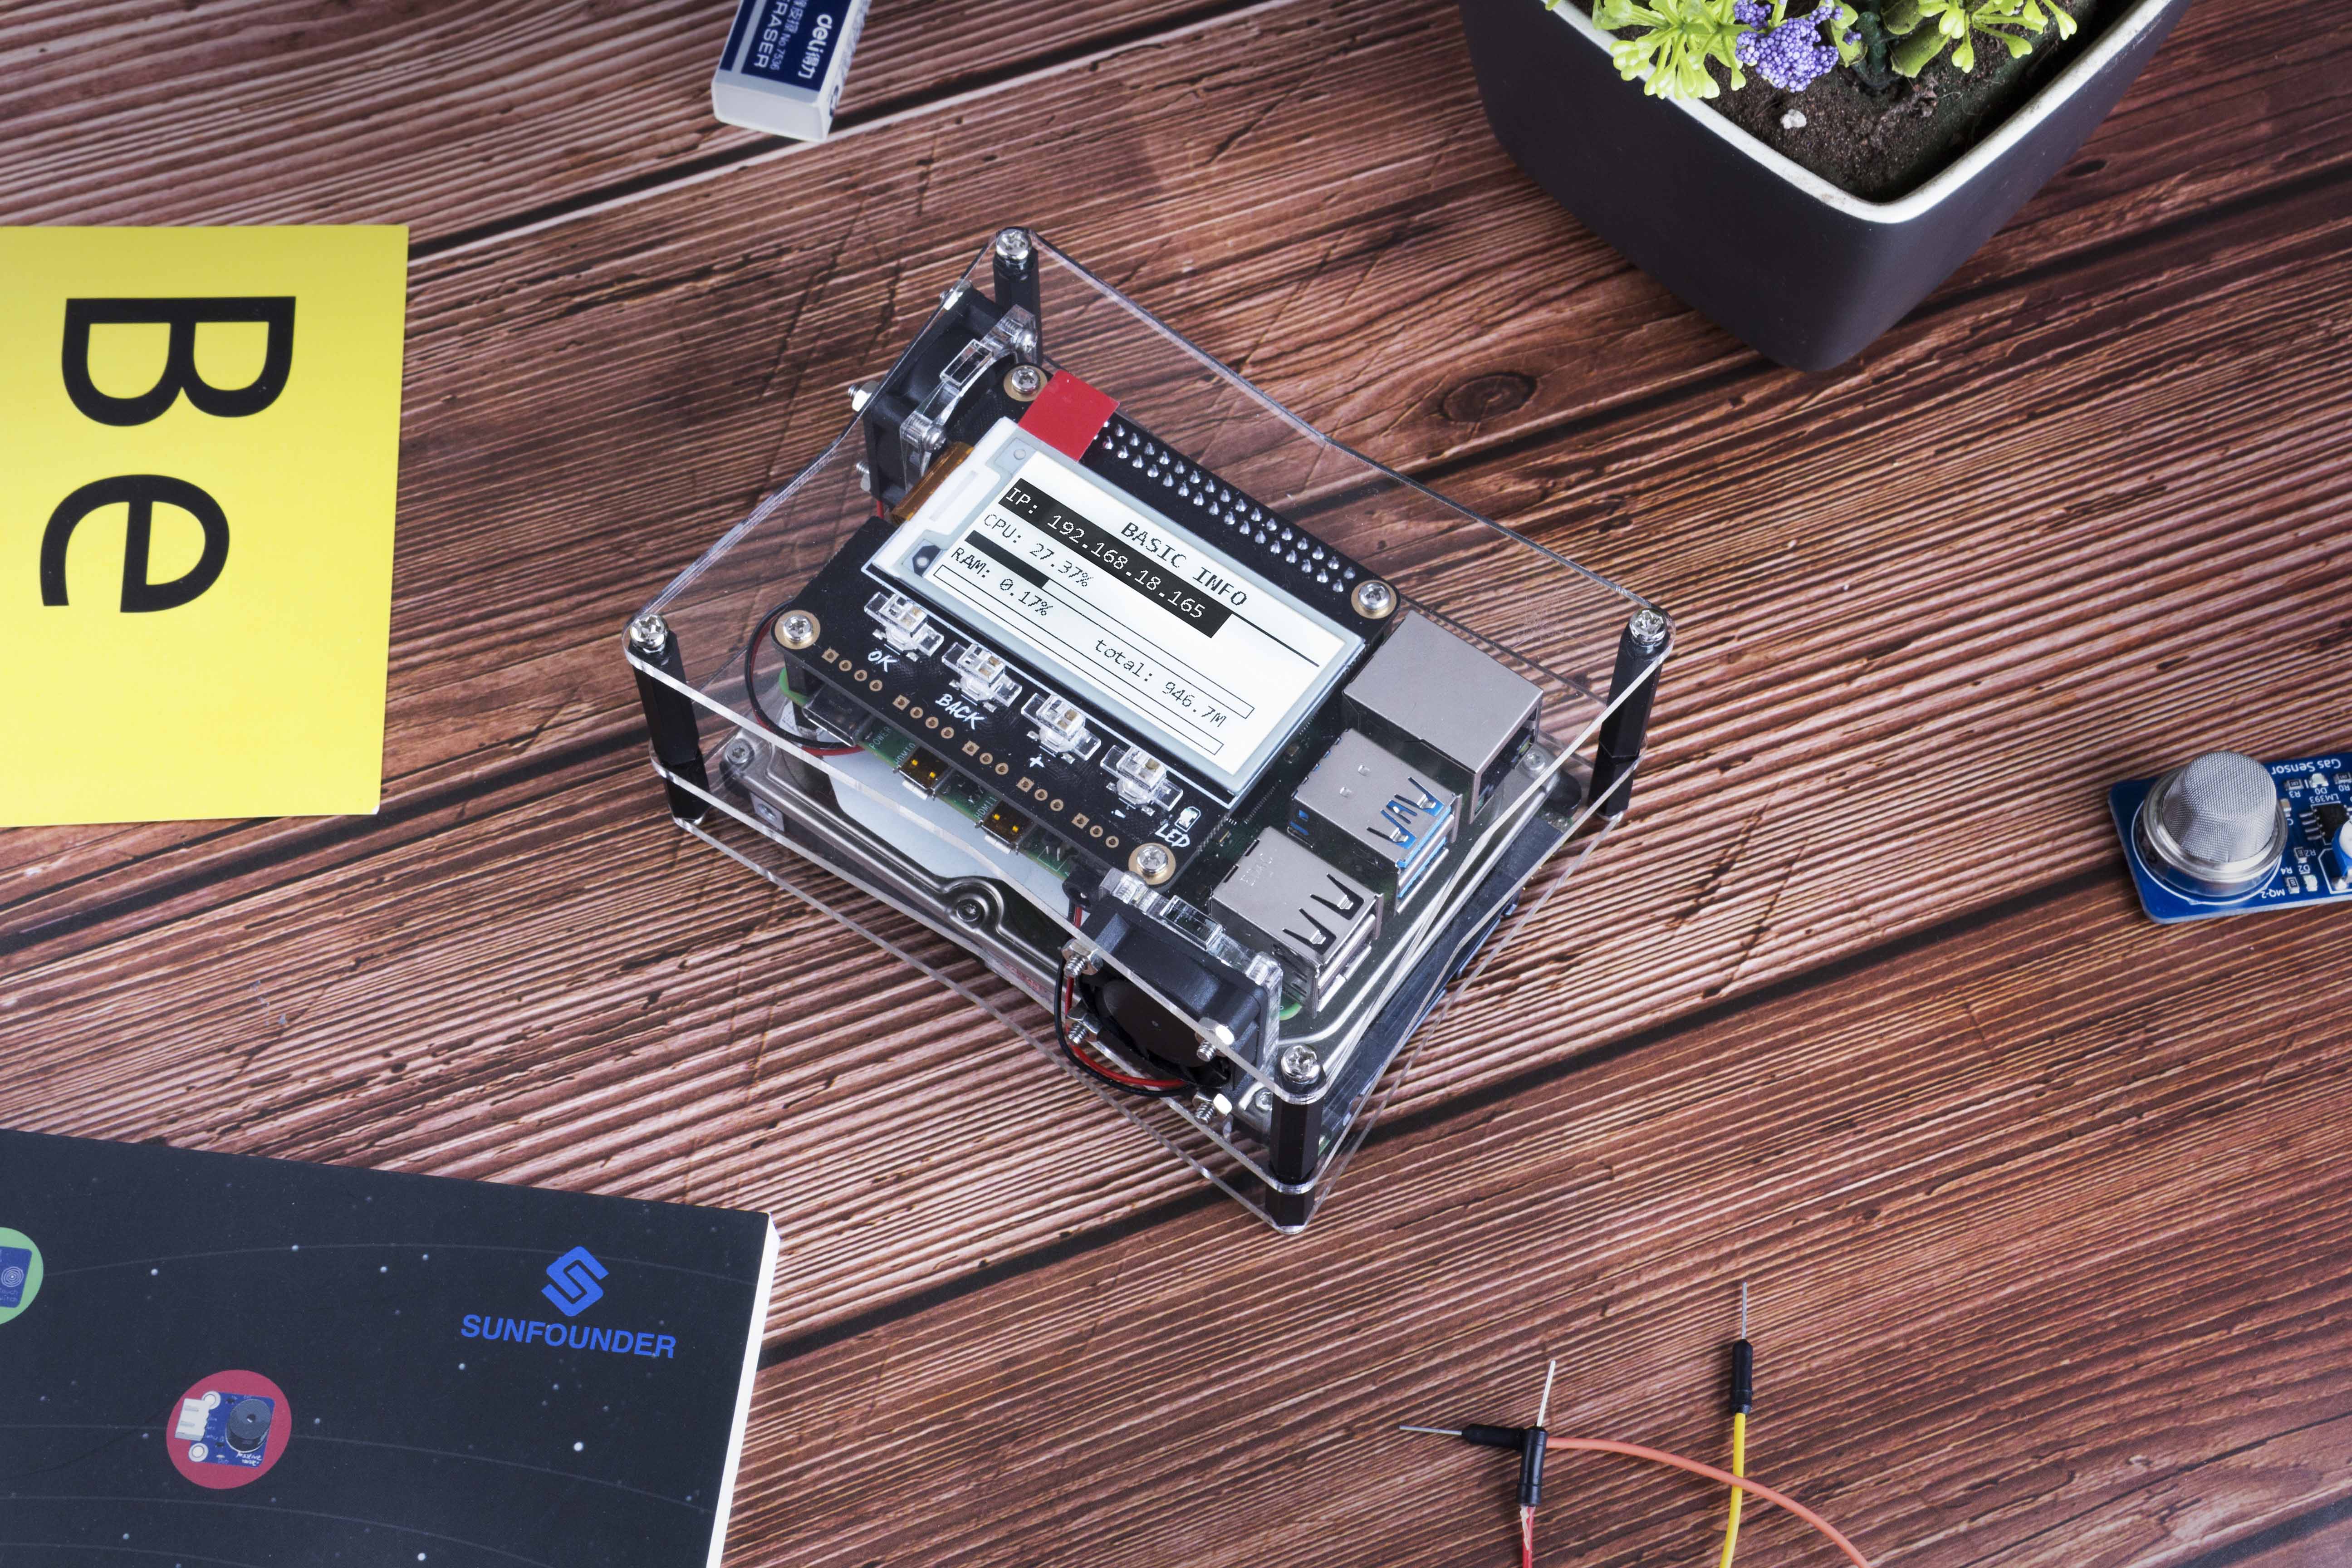
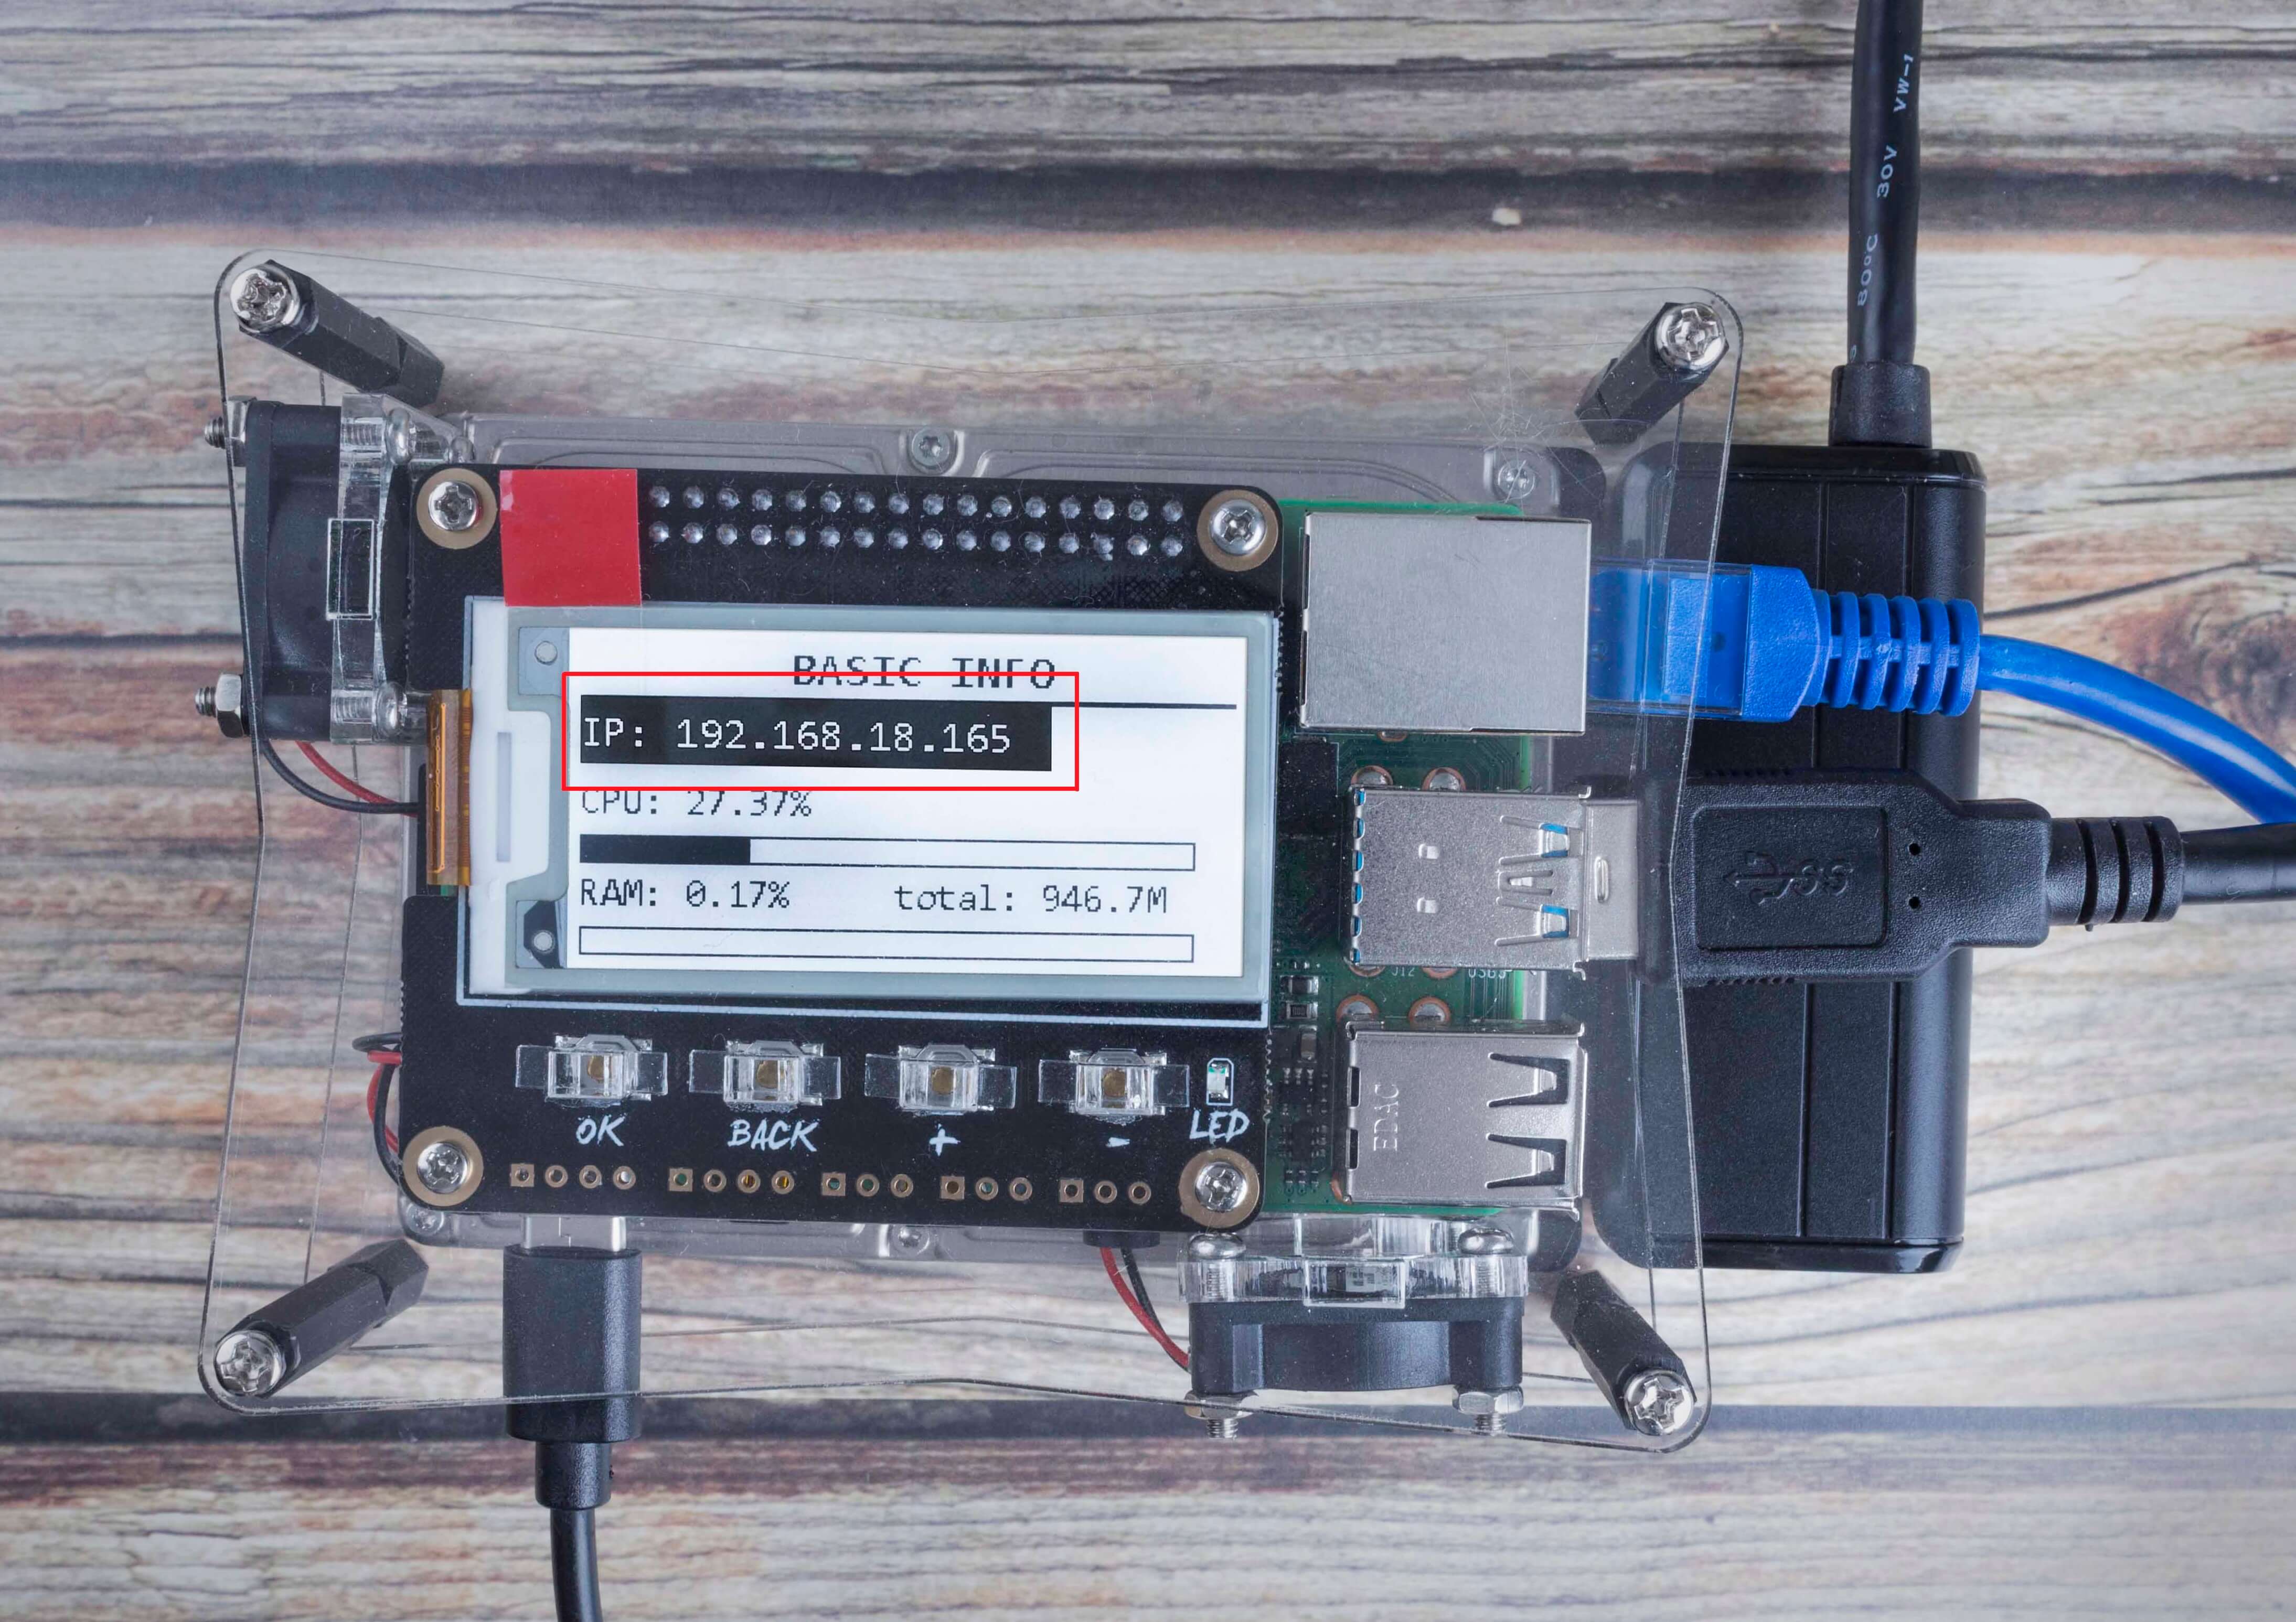
To better check the working condition of the disk and Raspberry Pi, I add an E-ink screen working as a display on the enclosure.
E-ink screen is a screen that uses electric charge to change the distribution of black and white charged particles to achieve the display effect. It consumes power only when the screen is refreshed. Compared with the LCD screen, which needs continuous power supply; E-ink screen has very low power consumption.
In the image file, I add the code of E-ink screen so that the screen can display the Raspberry Pi IP adress, the remaining capacity of the disk, the current temperature of CPU and GPU, the usage condition of CPU and RAM.
Imagine how convenient it would be to access a shared disk via IP by simply walking up to the NAS and checking the IP address when you share folders with your friends. If you want to check the working of Raspberry Pi CPU, you don’t have to login to computer system. With NAS, all these data are clear at a glance.

In order to help The Raspberry to dissipate heat, I also added the code used to intelligently detect the CPU temperature of Raspberry Pi and control the fan. When the average temperature of the CPU or the GPU of Raspberry Pi is detected to reach 54°C or above, the fan will start to run automatically; meanwhile, the LED indicator on the extension board turns on.
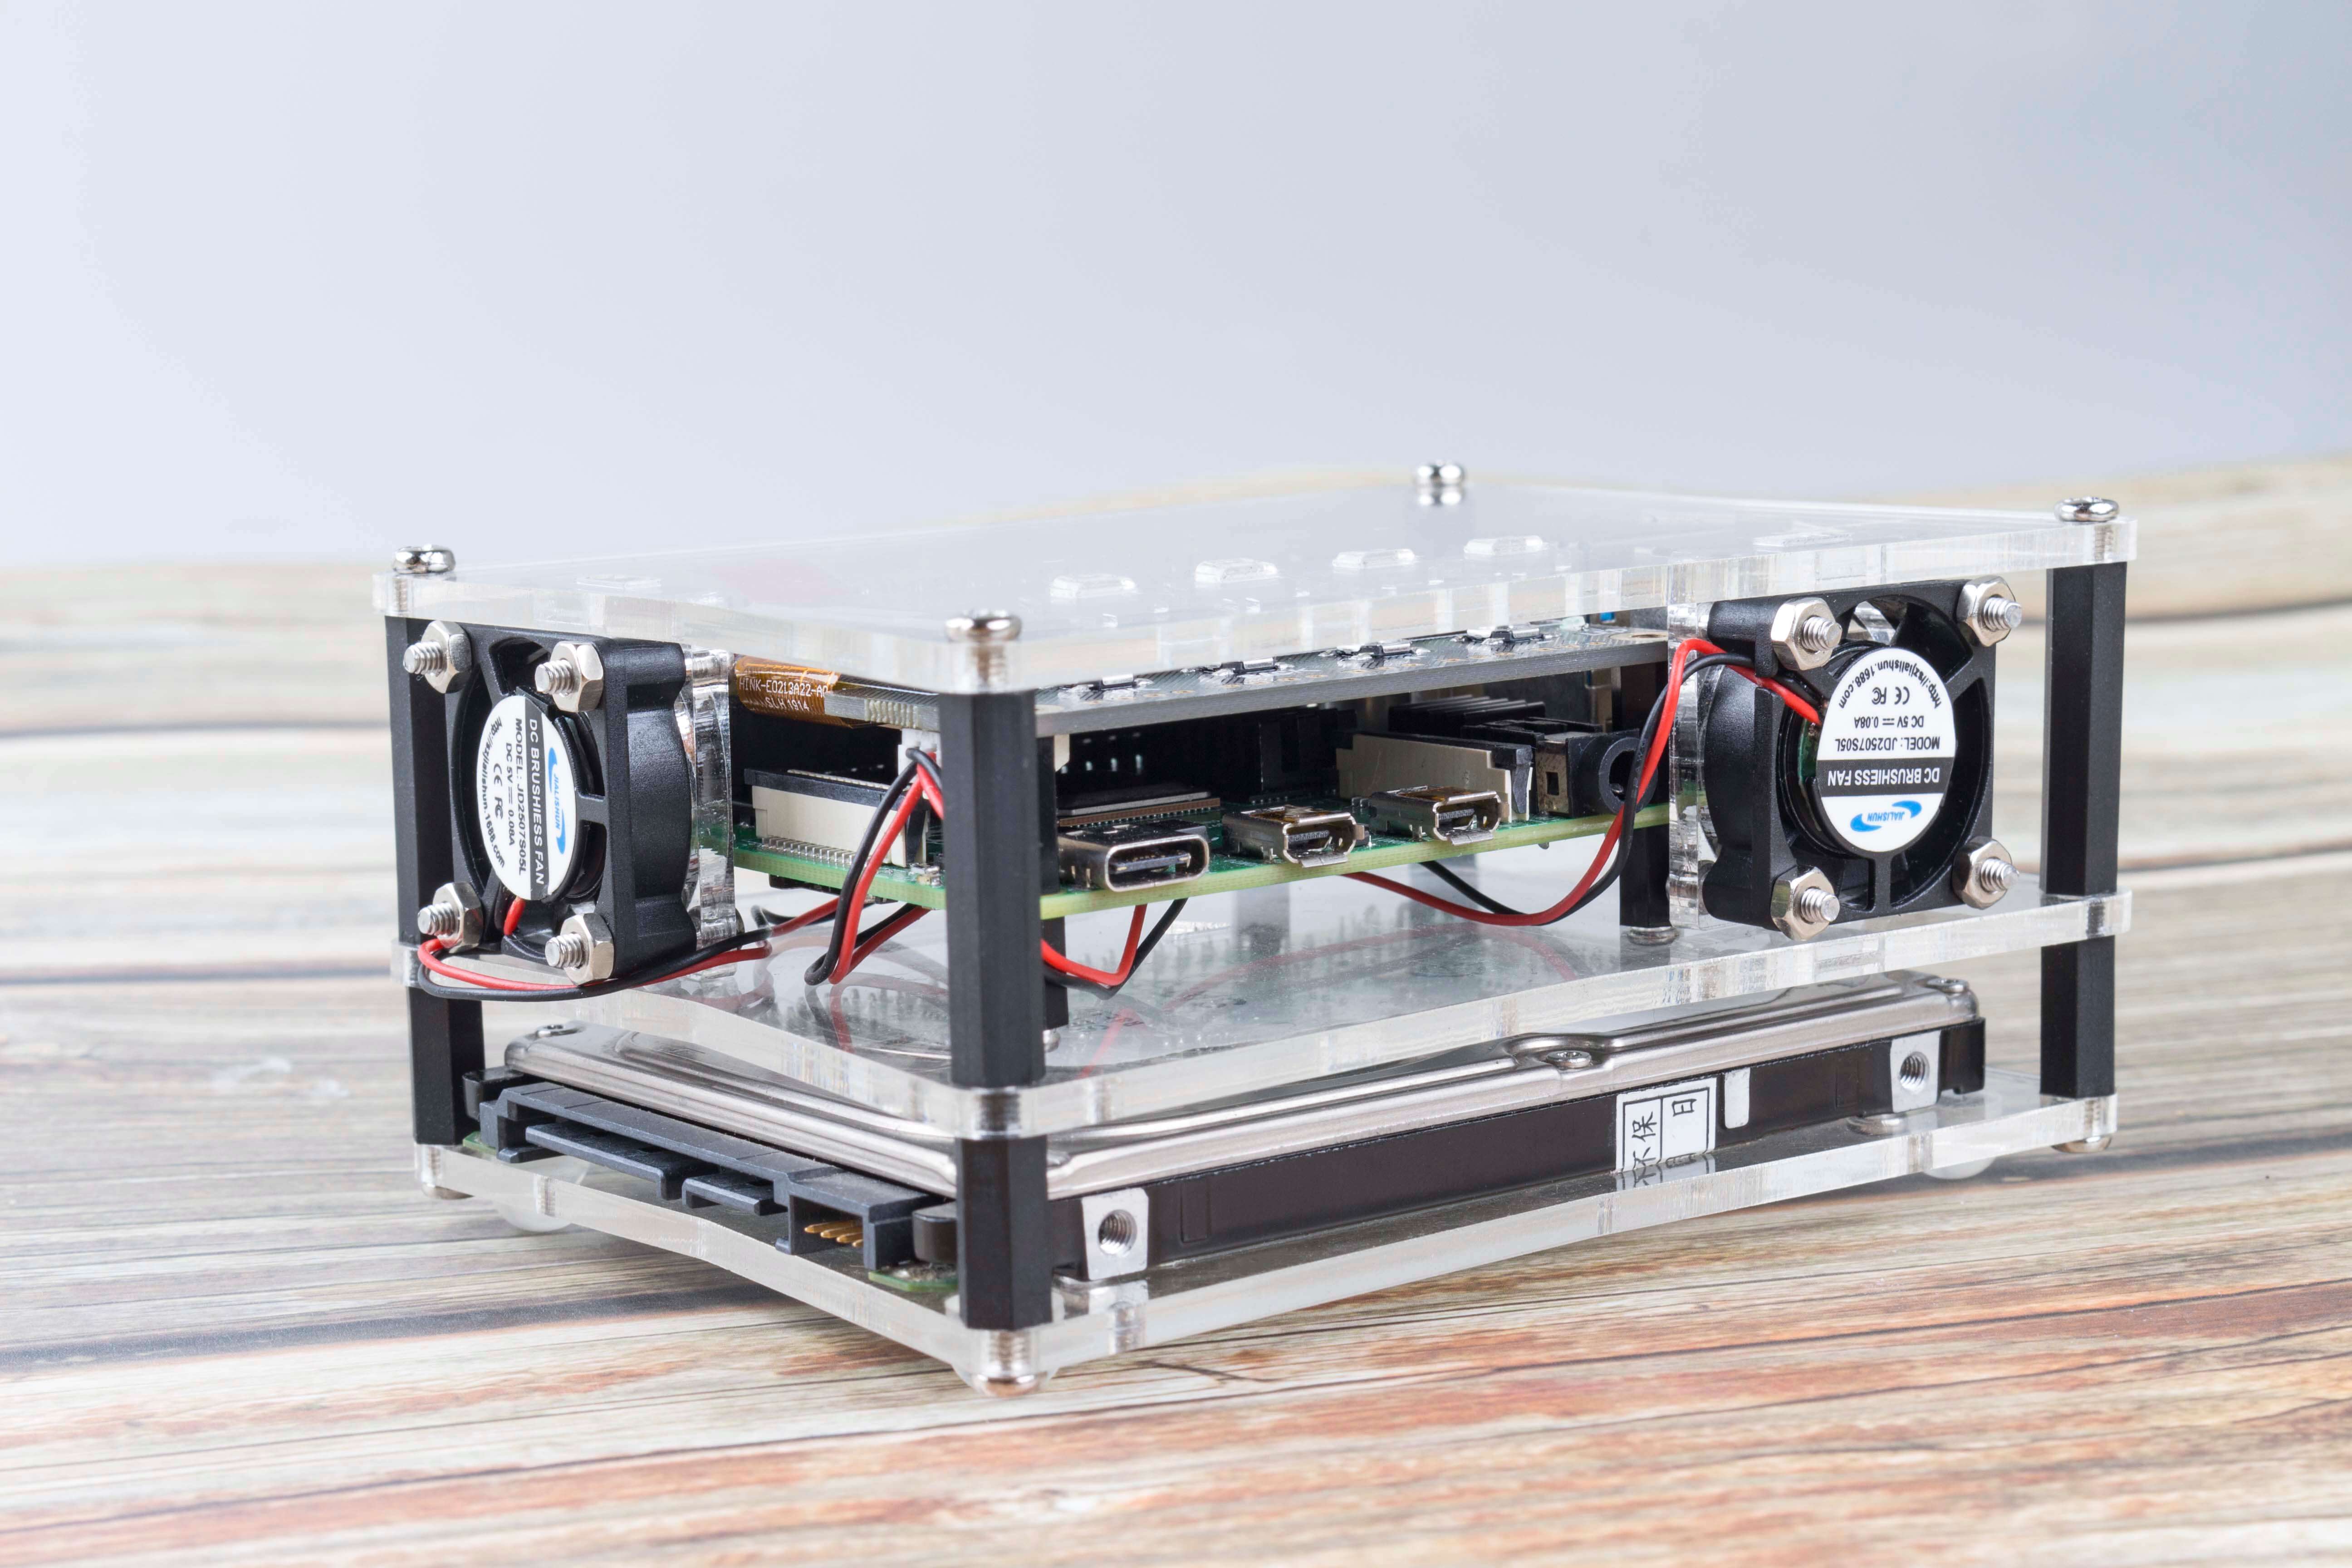
In addition to managing the E-ink screen and fan, several Raspberry Pi pins are preset on the expansion board used to add some simple extension function.
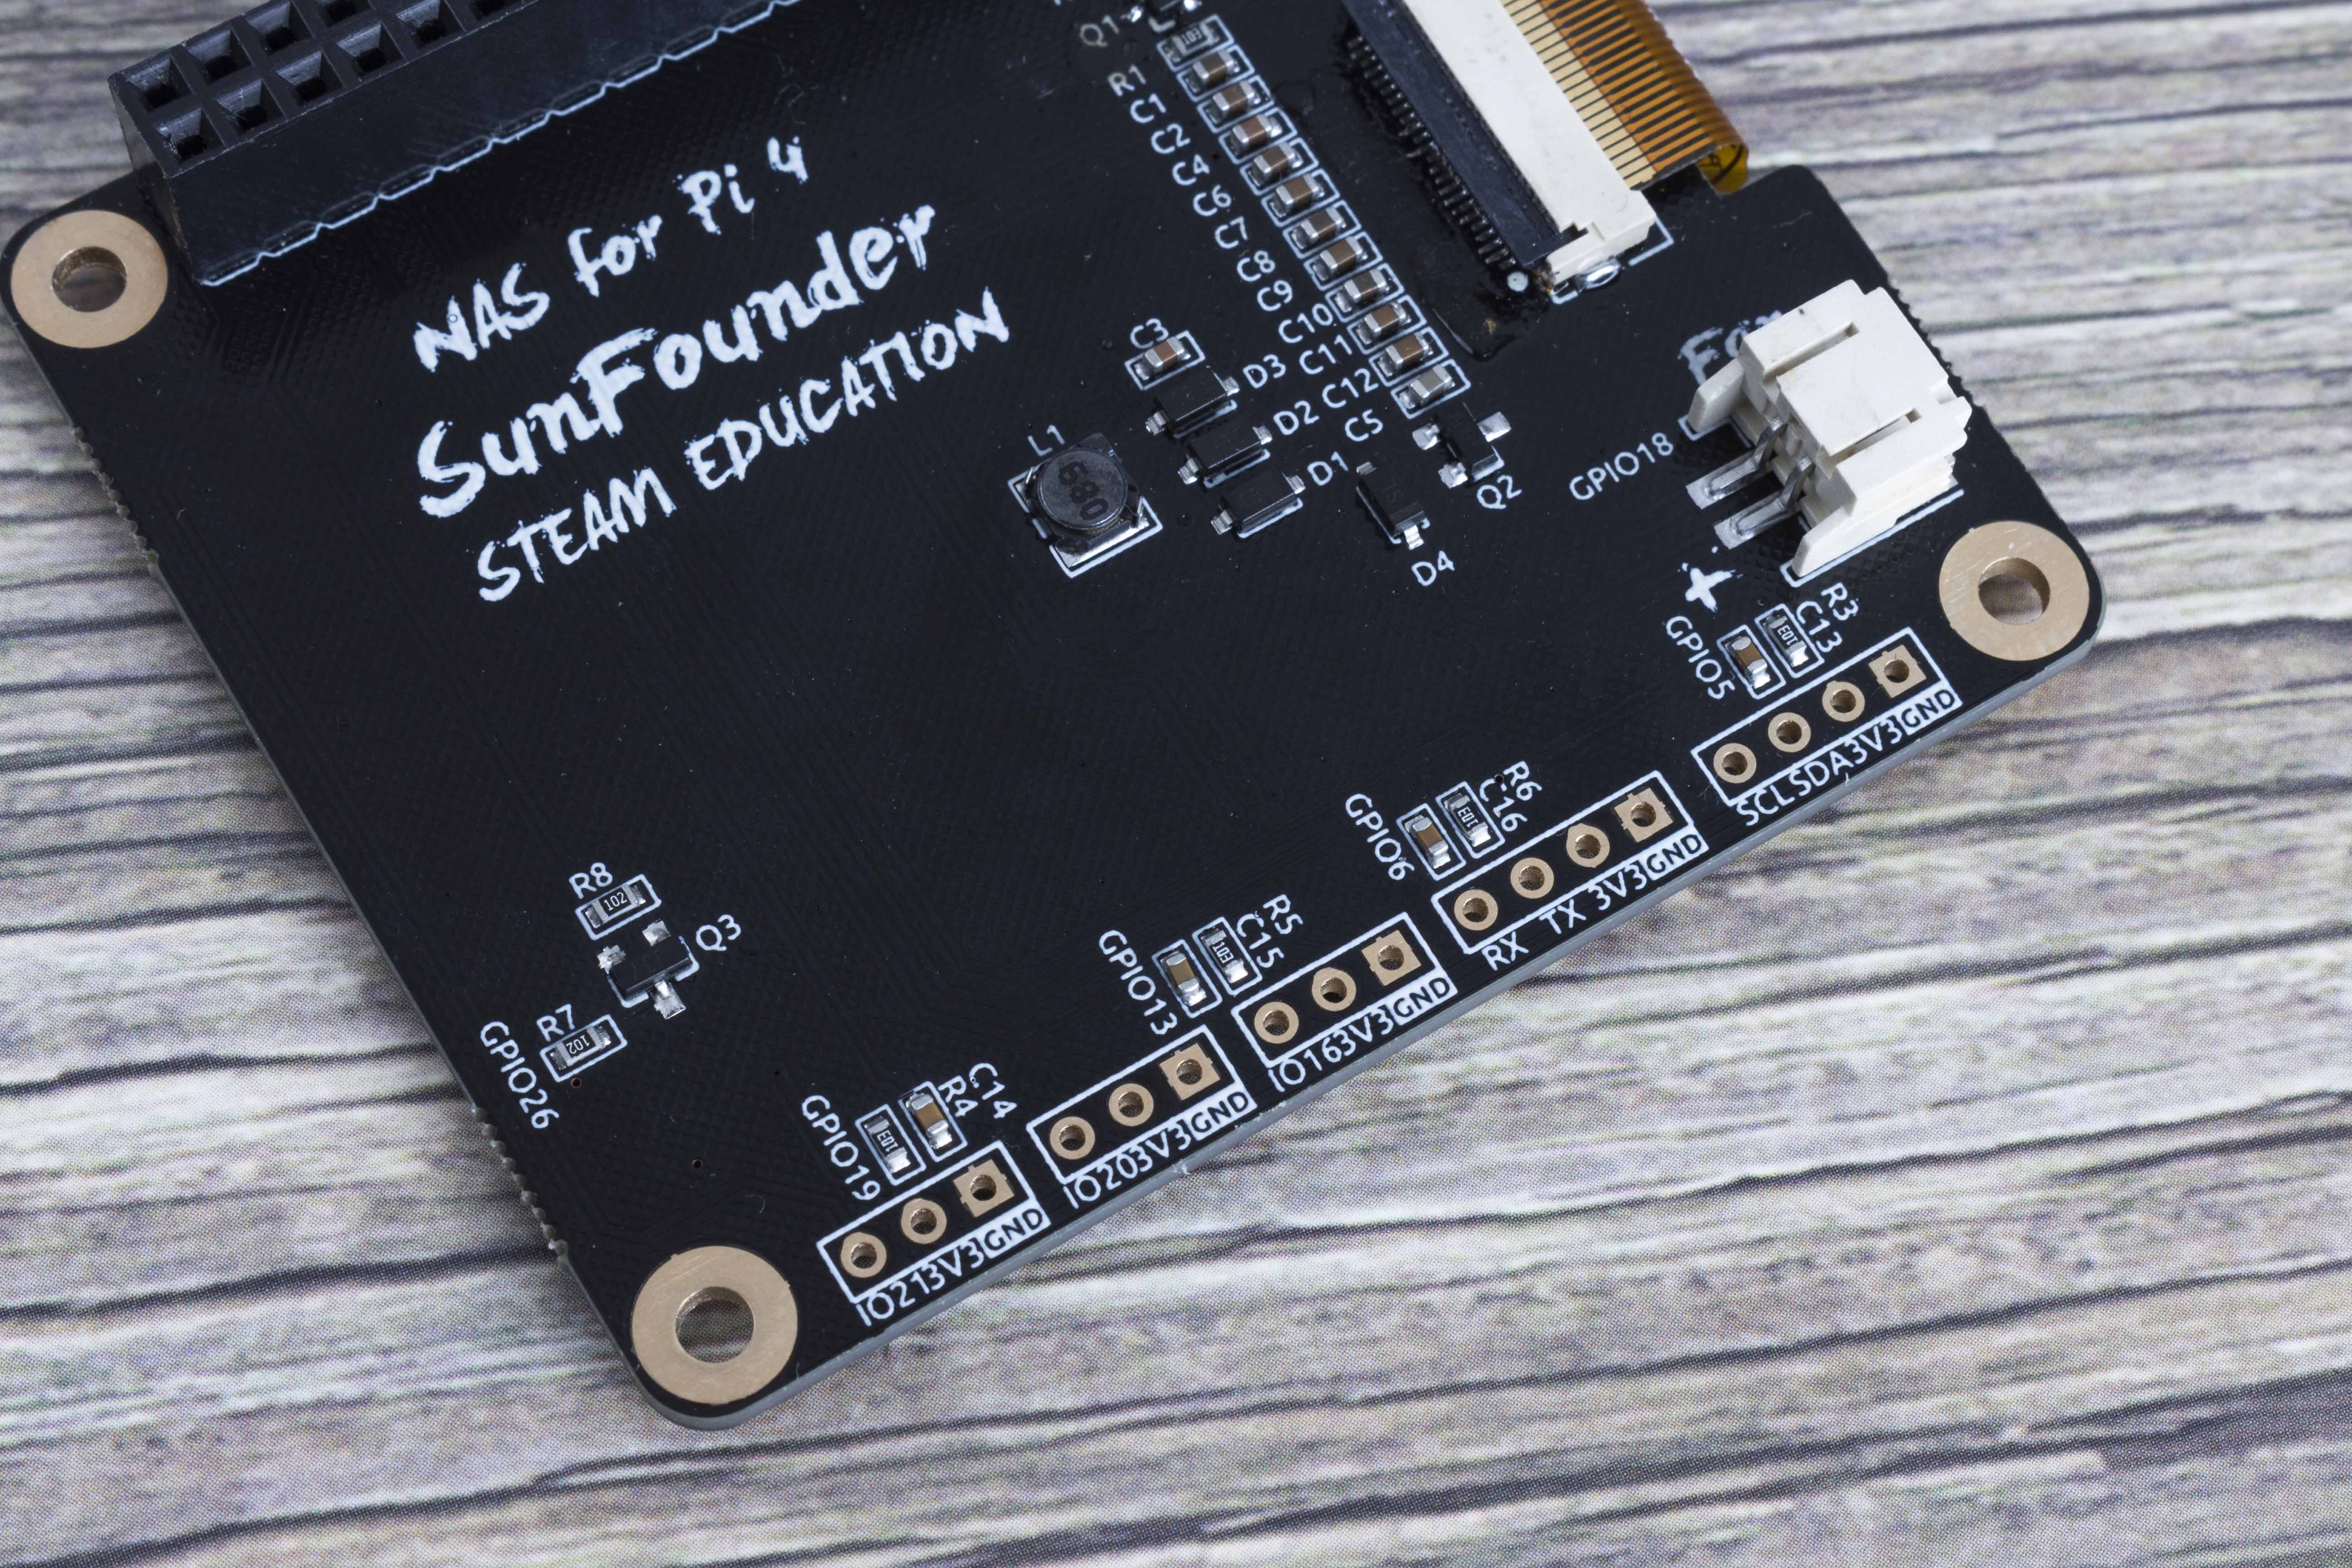
For example, a human body infrared detection sensor and LED are added to make the LED light up when people are detected approaching. If you are interested in this project, you can refer to our GitHub link.
Finally, I use a few custom acrylic boards and nylon standoffs to DIY NAS building. The benefit of customizing the case by me is that I can change the shape of the NAS Box whenever I need to, such as adding a drive bay to put on more disks. Therefore, the form factor of my entire box is shown in the picture below, very small.

Set up NAS Server By OpenMediaVault Operating System
Next, I will introduce and guide you that how to configure the OMV interface and set up your private NAS server. The steps are as follows:
1. Download the OMV image file for Raspberry Pi.
If you make your own Raspberry Pi NAS server, you can download it from the OMV website. If you purchase our kit, you can use the image file accompanied with our E-ink screen and smart fan code directly
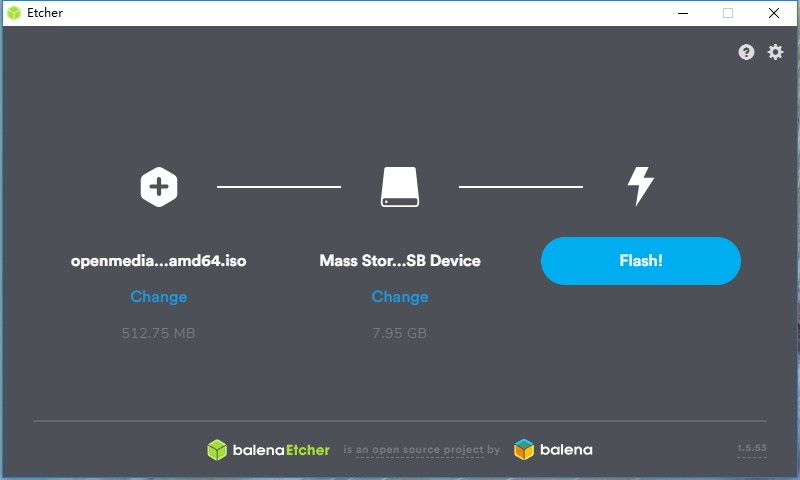
2. Flash the Downloaded OMV image into SD card.
It’s recommend that you use Etcher to flash image file into SD card. Etcher supports Windows OS, Mac OS, and Linux OS. You can download the free Etcher via this link https://www.balena.io/etcher/. Install Etcher and Flash the SD card.
3. Plug USB disk and start up the Raspberry Pi.
4. Get Raspberry Pi IP address. Here are a few ways to check the Raspberry Pi’s IP address: ( https://www.raspberrypi.org/documentation/remote-access/ip-address.md ).
SunFounder NAS Kit can show the IP address directly when you connect all the cable and support the power.
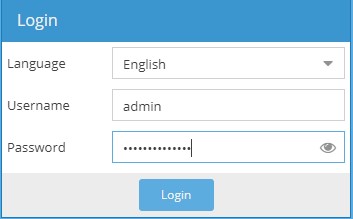
5. Log in to the OMV interface on your computer and change your username and password to configure your NAS server.
Enter the IP address of Raspberry Pi into the browser to enter the operation page of OMV. The default user name is “admin” and the password is “openmediavault”.
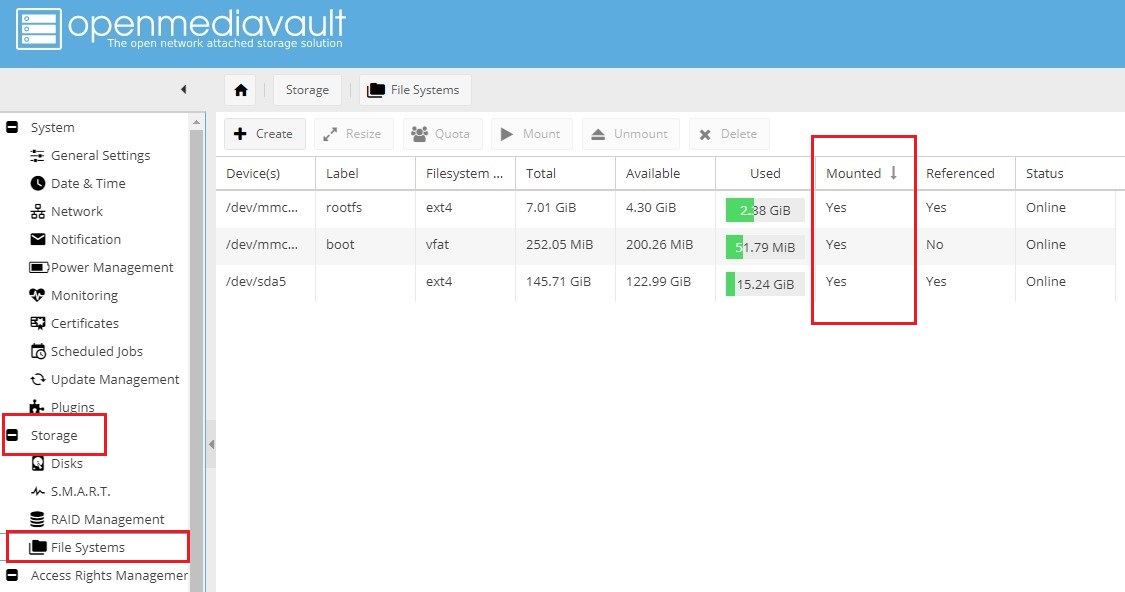
Click Storage > File Systems, and check the disk to see if the hard drive is mounted.
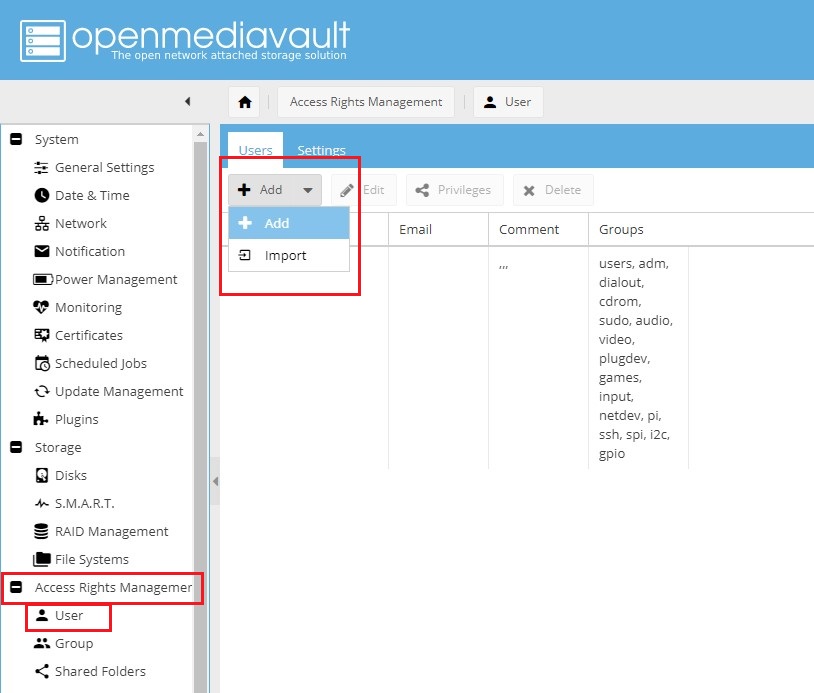
6. Create new users and groups.
You can find the “USER” under the “Access Rights Manager”. Create new user and group to manage your friends’ user permission on your shared folders.
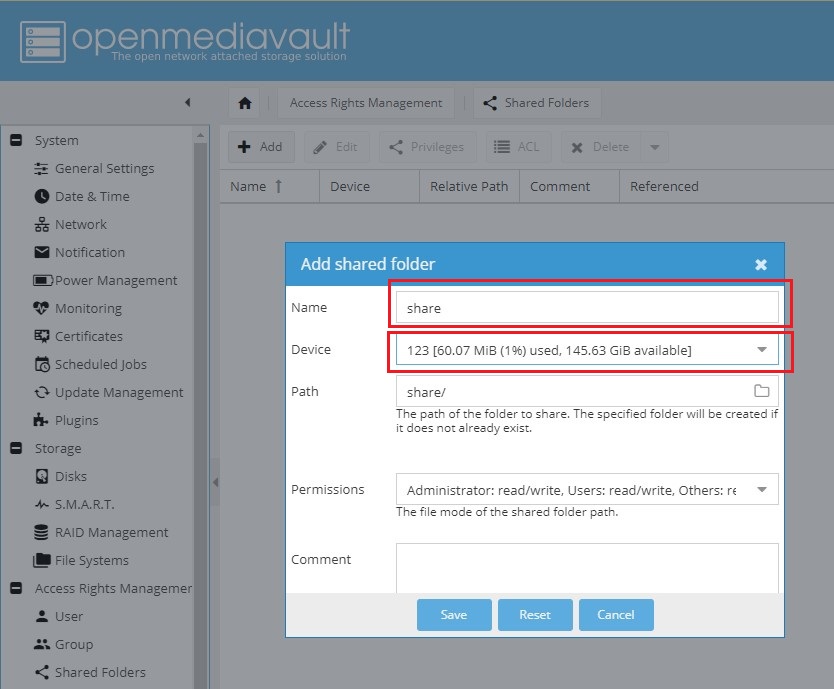
7. Create shared folders and set access rights management by options.
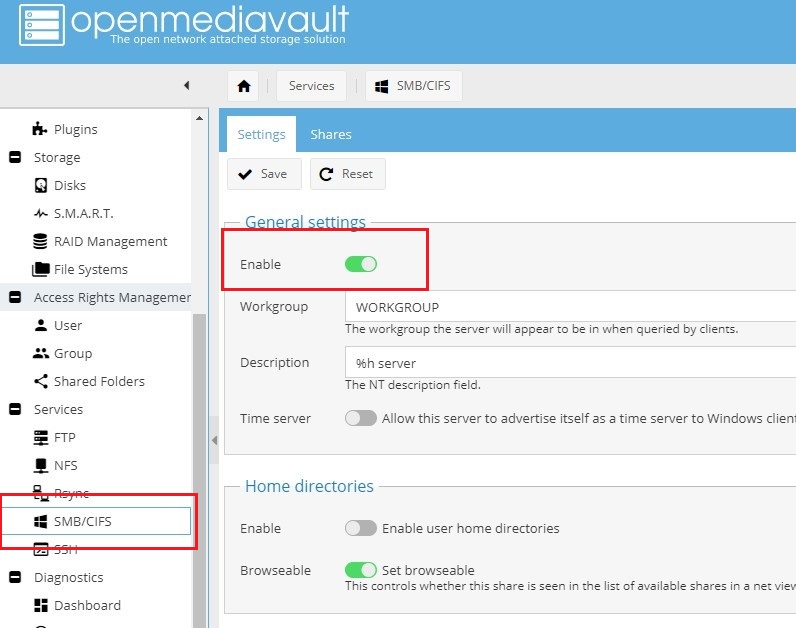
8. Switch on the smb/ cifs service for sharing.
Find the smb/ clifs and the Enable switch options to set rights.
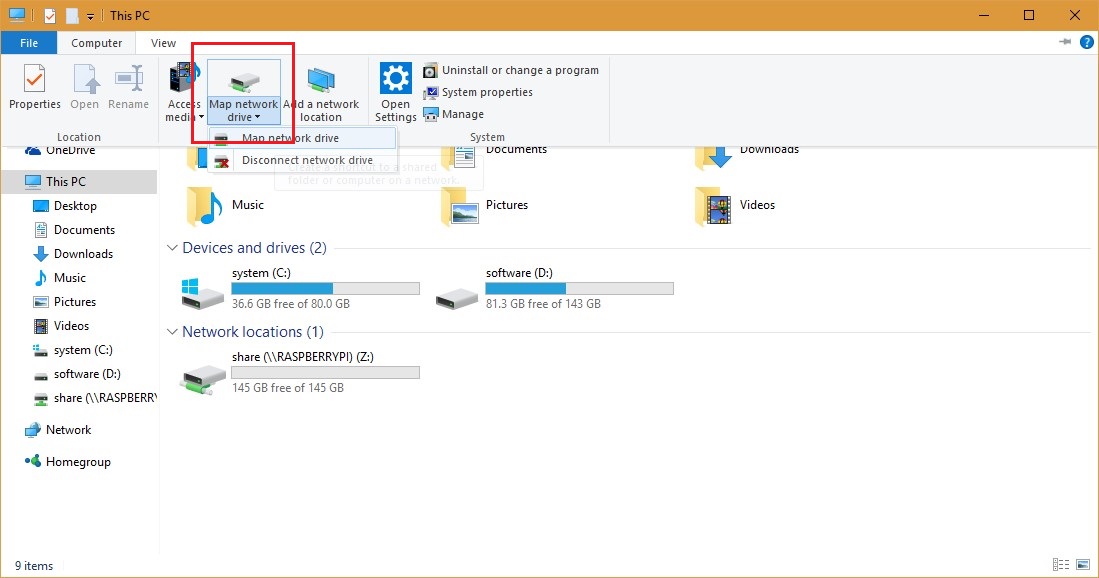
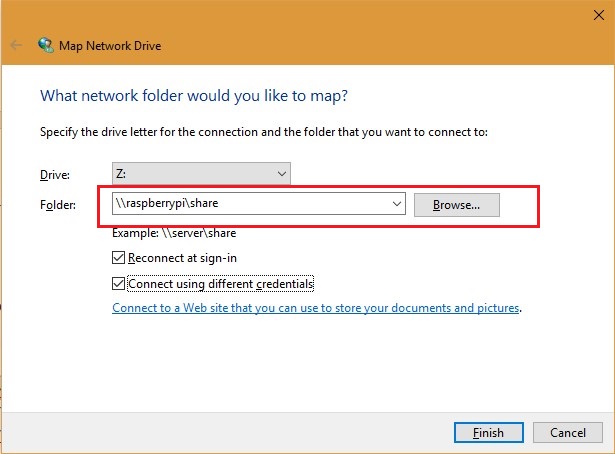
9. Access and read and write shared folder content
Input IP address to access and read/write the shared folder easily.
If you faced any difficulties, you can go to Google, GitHub or other major forums to consult or find source, or read our detailed OMV operation PDF document source ( https://www.sunfounder.com/learn/category/sunfounder-nas-kit.html ).
Summary
When choosing NAS, we need to consider price, storage capacity, function, noise, and power consumption. Raspberry Pi NAS box is a good solution.
If you’re struggling to get a private cloud disk to have file sharing with friends and family, but scared of NAS devices high price, why don’t you think about our solution and have a try?
Except for Raspberry Pi and hard disk, our kit contains all the above things needed to make a Raspberry Pi NAS: acrylic enclosure and assembly parts, extension board with E-ink screen, a dual-radiator fan, the SD card with installed image files, USB3.0 high speed to SATA cable.
Open the package, and you’ll be able to share it with your family and friends in a few minutes by following the tutorial we wrote. Thanks for supporting SunFounder Raspberry Pi NAS Kit!