
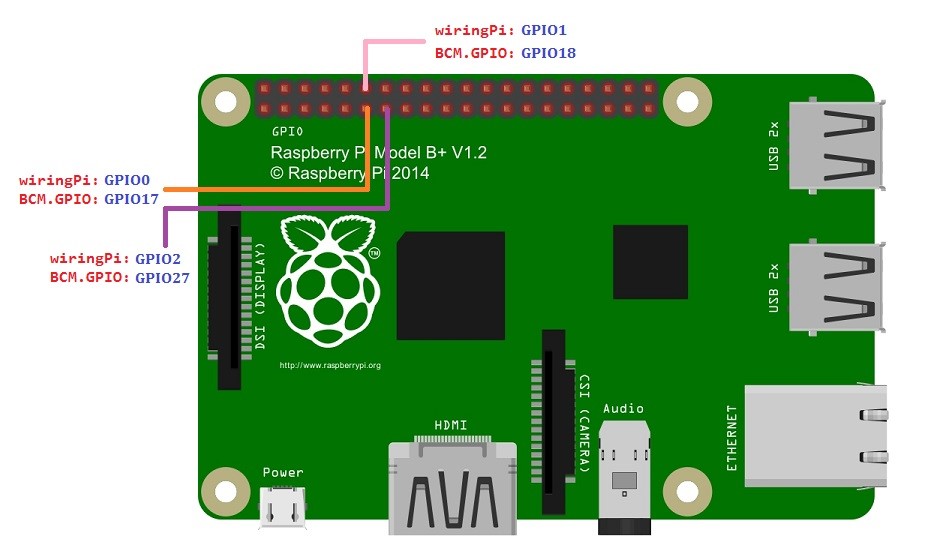
Currently, you can number the pins of Raspberry Pi in three ways:
- Numbering based on the physical location of pins
- Numbering appointed by the wiringPi library in C language
- Numbering appointed by BCM2835 SOC
If you want to operate Raspberry Pi GPIOs in C language based on the wiringPi library, choose numbering appointed by wiringPi. You can see from the above diagram that GPIO0 in wiringPi corresponds to pin 11 numbered by physical location, and GPIO30, to pin 27.
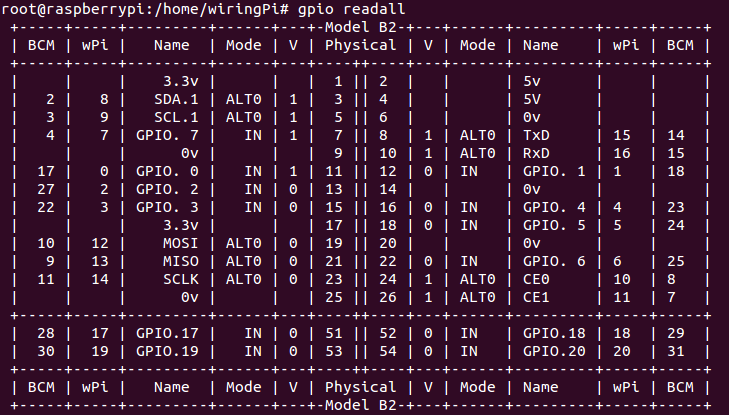
The picture below demonstrates the physical numbers of the three pins 11, 12, and 13 in detail:
If you are a C user, please install wiringPi.
About wiringPi
WiringPi is a GPIO access library written in C for the BCM2835 used in the Raspberry Pi. It’s released under the GNU LGPLv3 license and is usable from C and C++ and many other languages with suitable wrappers. It’s designed to be familiar to people who have used the Arduino “wiring” system.
How to install
Step 1: Get the source code of wiringPi
git clone git://git.drogon.net/wiringPi
Step 2: Install wiringPi
cd wiringPi
git pull origin
./build
Press Enter. With the script build, the source code of wiringPi will be compiled automatically and installed to the appropriate directory of Raspberry Pi OS.
Step 3: Test whether wiringPi is installed successfully or not
WiringPi includes many GPIO commands which enable you to control all kinds of ports on Raspberry Pi. You can test whether the wiringPi library is installed successfully or not by the following commands.
gpio –v

If the message above appears, it means the wiringPi is installed successfully.
$gpio readall
If you are a Python user, you can program GPIOs with API provided by RPi.GPIO.
RPi.GPIO Introduction
RPi.GPIO is a module to control Raspberry Pi GPIO channels. This package provides a class to control the GPIO on a Raspberry Pi. For examples and documents, visit http://sourceforge.net/p/raspberry-gpio-python/wiki/Home/
Raspbian OS image of Raspberry Pi installs RPi.GPIO by default, so you can use it directly.
You might want to install the python-dev package.
sudo apt–get install python–dev
Next, use C or Python language to program. You will learn how to use wiringPi and RPi.GPIO module to control Raspberry Pi GPIOs. Take blinking LED for example. First, build the circuit according to the following diagram:
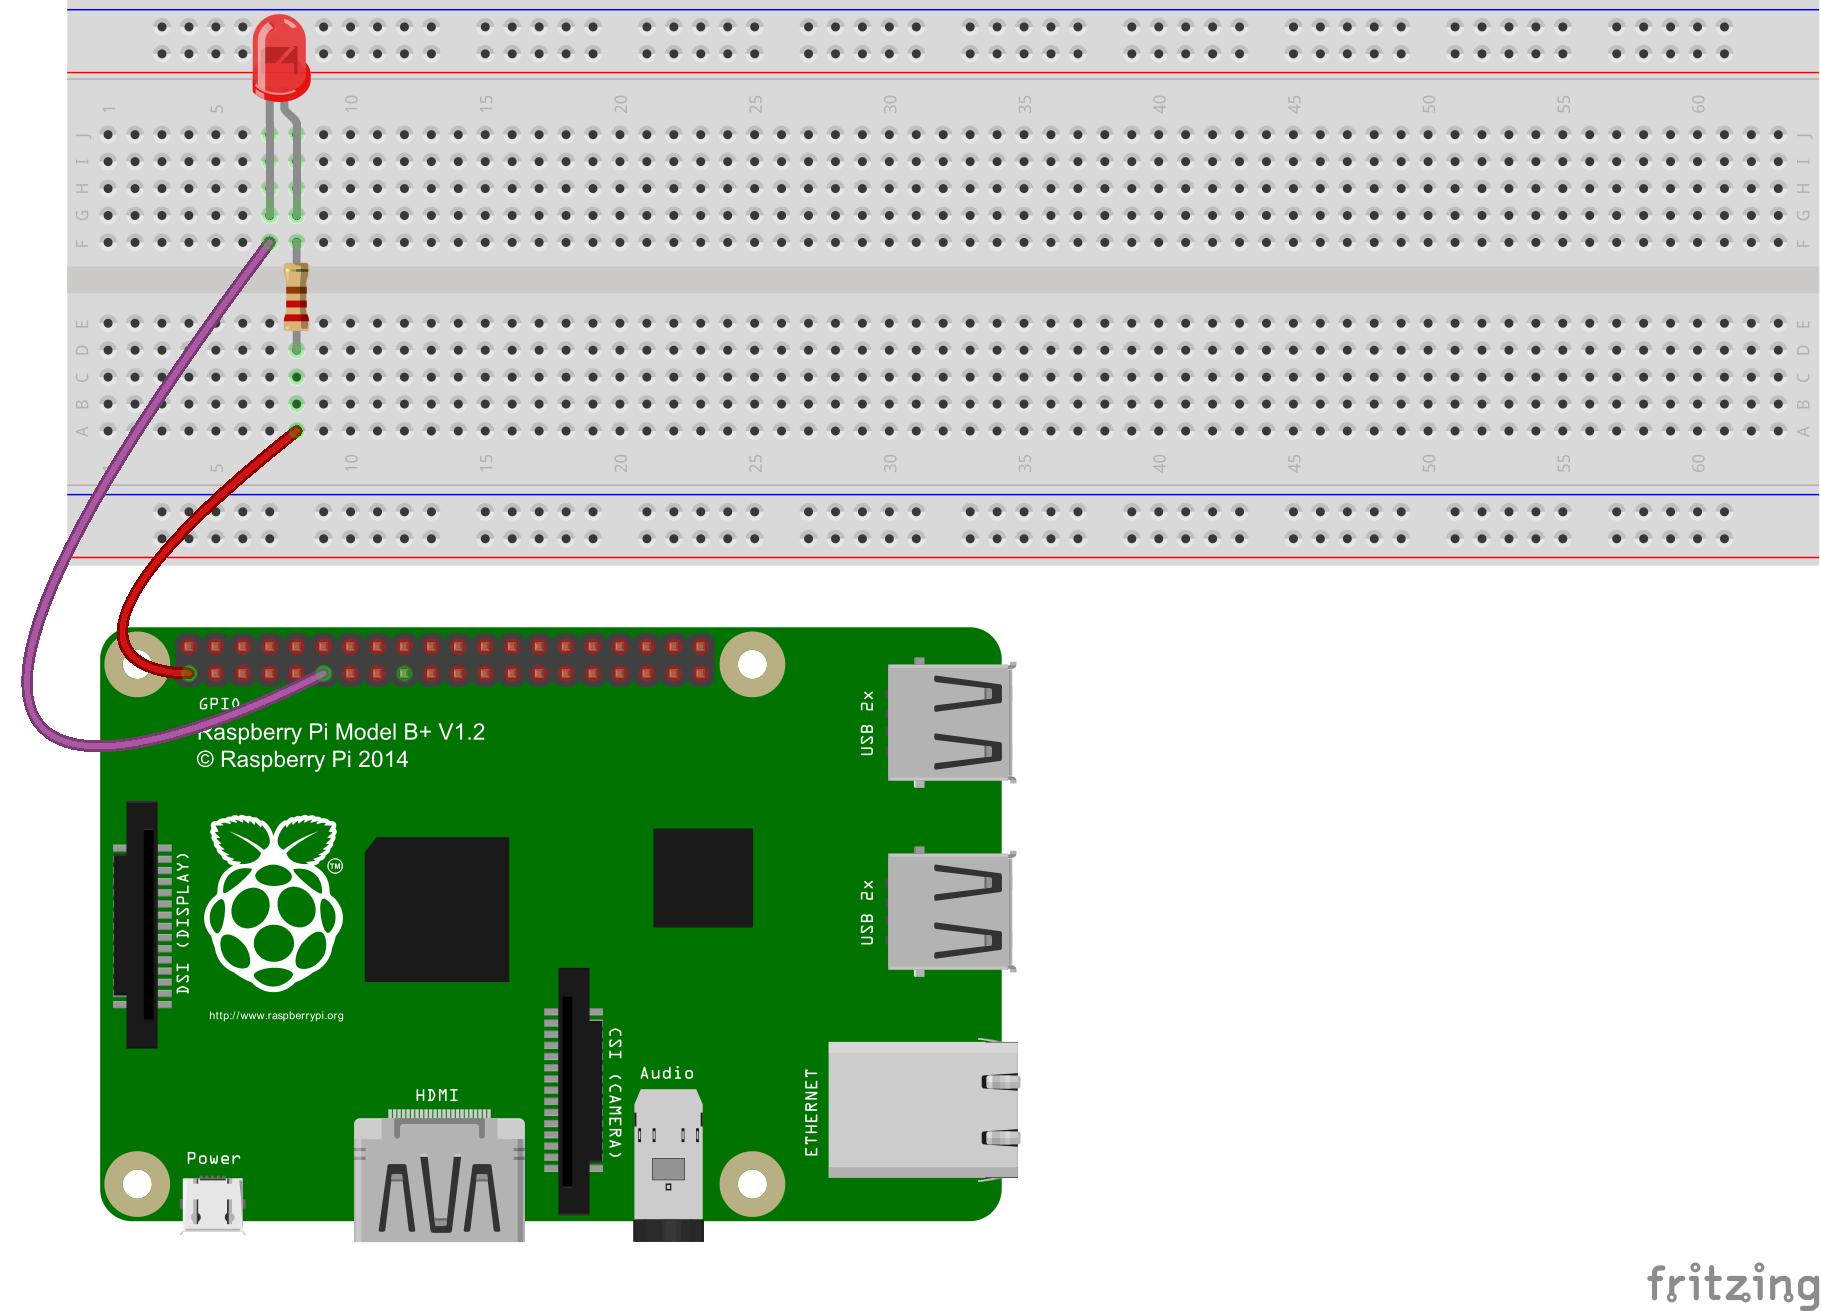
Note: The resistance of the resistor here is 220Ω. If the resistance is too high, the LED will be too dim or even won’t light up.
For C language users (based on the wiringPi library):
Step 1: Create a C file named led.c
touch led.c
Step 2: Use nano or other code edit tools to open led.c, write down the following code and save it.
#include <wiringPi.h>

#include <stdio.h>


#define  LEDPin    0


int main(void)

{

  if(wiringPiSetup() == -1){//when the wiringPi initialization fails, print message to the screen.

    printf("setup wiringPi failed !");

    return 1;

  }


  pinMode(LEDPin, OUTPUT);


  while(1){

    digitalWrite(LEDPin, LOW);   //led on

    printf("led on...\n");

    delay(500);

    digitalWrite(LEDPin, HIGH);  //led off

    printf("...led off\n");

    delay(500);

  }

  return 0;

}
Step 3: Compile
gcc led.c –o led –lwiringPi
Step 4: Run
sudo ./led
You should see the LED blinking. Press Ctrl+C to terminate the program.
For Python users (based on the RPi.GPIO python module):
Step 1: Create a Python file named led.py
touch led.py
Step 2: Use nano or other code edit tools to open led.py, write down the following code and save it.
#!/usr/bin/env python

import RPi.GPIO as GPIO

import time


LEDPin = 11    # pin11


GPIO.setmode(GPIO.BOARD)       # Numbers GPIOs by physical location

GPIO.setup(LEDPin, GPIO.OUT)   # Set LEDPin's mode as output

GPIO.output(LEDPin, GPIO.HIGH) # Set LEDPin as high(+3.3V) to turn off the led


try:

  while True:

    print '...led on'

    GPIO.output(LEDPin, GPIO.LOW)  # led on

    time.sleep(0.5)

    print 'led off...'

    GPIO.output(LEDPin, GPIO.HIGH) # led off

    time.sleep(0.5)

except KeyboardInterrupt:  # When 'Ctrl+C' is pressed, the following code will be  executed.

    GPIO.output(LEDPin, GPIO.HIGH)     # led off

    GPIO.cleanup()                     # Release resource
Step 3: Run
sudo python led.py
You should see the LED blinking. Press Ctrl+C to terminate the program.