How to Configure the Firewall in Raspberry Pi
March 15, 2024

Introduction
Raspberry Pi firewall configuration is a crucial aspect of securing your device on any network. A firewall is an essential tool in any network, including that of a Raspberry Pi.A firewall is an essential tool in any network, including that of a Raspberry Pi. Essentially, a firewall acts as a security barrier between an internal network (such as that of your Raspberry Pi) and other external networks, such as the Internet. Its main purpose is to control and filter network traffic, allowing or blocking certain connections based on predefined rules — an essential step to secure Raspberry Pi systems.
Network traffic types
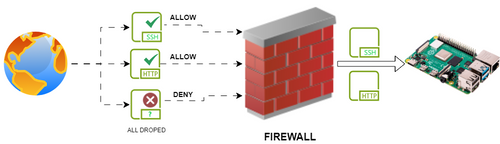
Incoming, outgoing, and forwarded traffic refer to different types of network traffic that can be controlled and managed by the firewall rules.
Incoming Traffic
Incoming traffic refers to data packets that are destined for the Raspberry Pi from external sources, such as requests to access services running on the Raspberry Pi from devices on the internet or other devices on the local network. Examples include requests to access a web server, SSH connections, or any other service running on the Raspberry Pi.
When performing Raspberry Pi firewall configuration, you can define rules to allow or deny incoming traffic based on various criteria, such as the source IP address, destination port, protocol, etc. This helps in protecting the Raspberry Pi from unauthorized access or potential security threats.
Outgoing Traffic
Outgoing traffic refers to data packets that originate from the Raspberry Pi and are destined for external destinations, such as requests made by services running on the Raspberry Pi to access resources on the internet or other devices on the local network. Examples include web requests initiated by a web server running on the Raspberry Pi or software updates fetching data from the internet.
Controlling outgoing traffic is also important for security and privacy reasons. Firewall rules can be configured to allow or deny outgoing traffic based on specific criteria, such as destination IP address, destination port, protocol, etc. This can help in preventing unauthorized communication from the Raspberry Pi to external destinations or controlling access to specific resources.
Forwarded Traffic
Forwarded traffic refers to data packets that are passing through the Raspberry Pi from one network interface to another. This typically occurs when the Raspberry Pi is acting as a router or gateway between different networks, such as between a local network and the internet.
Firewall rules can also be applied to control forwarded traffic, allowing you to define rules to allow or deny the forwarding of packets based on specific criteria, such as source and destination IP addresses, ports, protocols, etc. This helps in controlling the flow of traffic between different network segments and enforcing security policies.
•When it comes to Raspberry Pi network security, a firewall can play several important roles—refer to the Raspberry Pi official security guide for more tips on protecting your device.
•Home network protection: If you use your Raspberry Pi as a server or device connected to your home network, a firewall can protect devices and data on your network by controlling what traffic can enter or leave it.
•Server security: When considering Raspberry Pi server security, a firewall is essential to protect against unauthorized access attempts by filtering and blocking unwanted or malicious requests.
•Remote access control: If you access your Raspberry Pi remotely via SSH or other services, a firewall can limit access only to certain IP addresses or IP address ranges, thereby increasing security.Refer to the official iptables documentation for best practices: iptables tutorial and usage examples (Netfilter Project)
•Blocking unwanted traffic: A firewall can block certain types of traffic, such as spam traffic, known botnet traffic, or any other unwanted traffic that may pose a threat to the security of your Raspberry Pi or your network.Whether you use iptables, UFW, or GUFW, applying proper firewall rules is critical for Raspberry Pi server security.
Raspberry Pi iptables Firewall Configuration

A typical Raspberry Pi firewall setup involves using a tool called iptables,which is a user-space utility program that allows a system administrator to configure the IP packet filter rules of the Linux kernel firewall, implemented as different Netfilter modules.
Configuration the firewall (iptables) on a Raspberry Pi:
Before you configure UFW Raspberry Pi, make sure the system packages are up to date.
1.For an advanced firewall setup using IPFire on a Raspberry Pi, check out
sudo apt-get update
sudo apt install iptables
SunFounder's Raspberry Pi as a firewall guide for detailed instructions.Install iptables (if not already installed):
2.Define your firewall rules:
Decide what traffic you want to allow or deny. For example, if you want to SSH (port 22) and HTTP (port 80) traffic, but deny all other incoming traffic, you can define the rules accordingly.Read more on how to persist iptables rules across reboots via the official [Iptables Persistence documentation on Debian Wiki].
Here's an example of how to allow SSH and HTTP traffic and deny all other incoming traffic:
sudo iptables -A INPUT -p tcp --dport 22 -j ACCEPT # Allow SSH
sudo iptables -A INPUT -p tcp --dport 80 -j ACCEPT # Allow HTTP
sudo iptables -A INPUT -j DROP # Drop all other incoming traffic
3.Save your rules:
Once you've defined your rules and confirmed they work as expected, you'll want to save them so they persist across reboots. You can do this by using the `iptables-save` command:To take your firewall further, explore SunFounder's guide on transforming
sudo iptables-save > /etc/iptables/rules.v4
your Raspberry Pi into a powerful router, which includes advanced custom firewall rules strategies.
4.Make sure iptables rules are restored at boot:
sudo nano /etc/rc.local
Edit the `/etc/rc.local` file to load the saved rules at boot time. Open the file for editing: Add the following line before the `exit 0` line in the file:
/sbin/iptables-restore < /etc/iptables/rules.v4 Save the file and exit.
5.Restart your Raspberry Pi:
6.Check iptables rules:
sudo iptables -L
After rebooting, you can check if the iptables rules are applied correctly by running: This command will display the currently active iptables rules, which is a key step in verifying your Raspberry Pi firewall configuration.
UFW (Uncomplicated Firewall)

Raspberry Pi UFW (Uncomplicated Firewall) is a user-friendly tool for managing iptables firewall rules on Raspberry Pi systems.
Configuration UFW on a Raspberry Pi:
To configure UFW on Raspberry Pi, follow these simple steps:Before diving into Raspberry Pi UFW configuration, make sure the system is updated.
1.Looking to secure your Raspberry Pi surveillance or IoT setup? Check
sudo apt update
sudo apt install ufw
SunFounder's guide on building a secure Raspberry Pi security camera to see UFW in real-world use.Install ufw (if not already installed); see the [How to Configure the Firewall in Raspberry Pi](https://www.sunfounder.com/blogs/news/how-to-configure-the-firewall-in-raspberry-pi) article for full setup instructions.
2.Enable ufw:
Use this command to enable firewall Raspberry Pi, allowing it to start automatically on boot.This command will start the firewall and enable it to start automatically on boot.For full UFW commands reference, see the official Ubuntu UFW documentation.
3.Set default policies:
You can set the default policies for incoming, outgoing, and forwarded traffic. For example, to allow all outgoing traffic, deny all incoming traffic, and deny all forwarded traffic, you can use the following commands:
sudo ufw default allow outgoing
sudo ufw default deny incoming
sudo ufw default deny forwarded
4.Allow specific services or ports:
For an IoT-focused perspective, refer to SunFounder's post on setting up a Raspberry Pi network monitor, which integrates firewall configuration into a broader security
sudo ufw allow 22/tcp
sudo ufw allow 80/tcp
toolkit.You can allow specific services or ports by specifying them with ufw. For example, to allow SSH (port 22) and HTTP (port 80) traffic, you can use the following commands:
sudo ufw allow ssh
sudo ufw allow http
You can also specify the service name instead of the port number, for example:
5.Deny specific services or ports (optional):
If you want to explicitly deny certain services or ports, you can use the `deny`
sudo ufw deny 21/tcp
command. For example, to deny FTP (port 21) traffic, you can use:
6.Reload ufw:
After making changes to the firewall rules, you need to reload ufw for the changes to
sudo ufw reload
take effect:
7.Check ufw status:
sudo ufw status verbose
You can check the status of ufw and the firewall rules with the following command:
This command will display the current status of ufw and list all the configured rules.
That's it! You've now configured the firewall using ufw on your Raspberry Pi. ufw provides a simpler interface compared to directly manipulating iptables rules, making it easier to manage the firewall configuration.
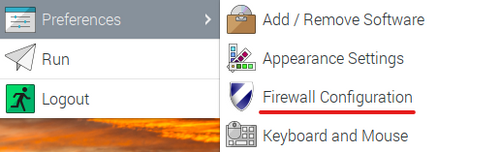
Gufw
Gufw Raspberry Pi provides a graphical interface for managing the Uncomplicated Firewall (ufw) on Ubuntu and other Debian-based Linux distributions. However, it's not typically installed by default on Raspberry Pi OS (formerly known as Raspbian), the official operating system for Raspberry Pi.

Configuration GUFW on a Raspberry Pi
1.Install gufw:
sudo apt update
sudo apt install gufw
2.Launch gufw:
After installation, you can launch gufw by searching for it in the applications menu, or
sudo gufw
you can start it from the command line:
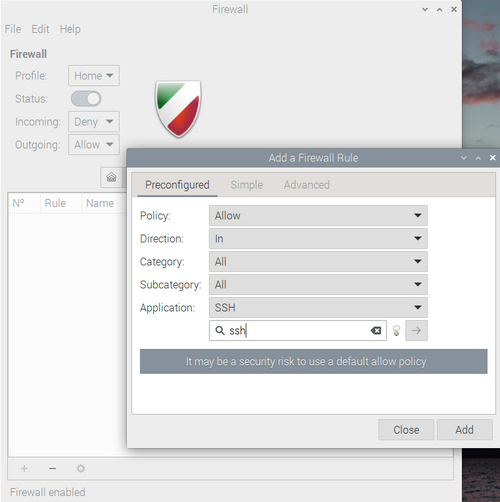
3.Configure Firewall Rules:
Once gufw is launched, you'll have a graphical interface where you can configure your firewall rules. You can enable or disable the firewall, allow or deny specific ports or applications, and set default policies for incoming, outgoing, and forwarded traffic.
4.Apply Changes:
After configuring your firewall rules in gufw, make sure to click the "Apply" button to apply the changes.
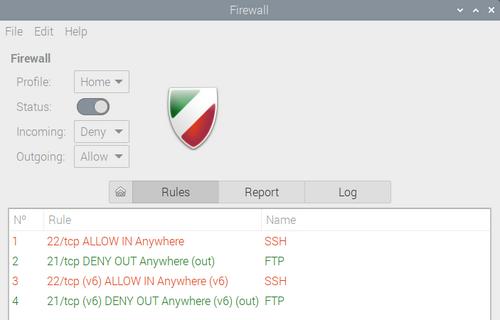
Implementing a proper firewall is a key component of Raspberry Pi network security, especially when using the device as a server or IoT gateway.Keep in mind that gufw is just a graphical interface for ufw, so all the configuration changes you make through gufw are essentially modifying ufw rules in the background.
Using gufw can be especially helpful if you prefer a graphical interface for managing your firewall rules or if you're less comfortable working with the command line.Additionally, SunFounder explores using Pi-hole ad-blocking alongside firewall protection in the Pi-hole installation guide, for enhanced home network privacy.Using a firewall is one of the most effective ways to secure Raspberry Pi, especially when it’s connected to public or remote networks.


