Mastering Remote Control: Unlocking the Power of SSH with Raspberry Pi
February 2, 2024
What is SSH?
How can we utilize SSH to connect, monitor, and perform additional tasks on a Raspberry Pi?
SSH into Raspberry Pi is one of the most efficient ways to manage your device remotely. But what exactly is SSH?If you're wondering how to use SSH with Raspberry Pi, you're not alone. —check out the SunFounder Raspberry Pi SSH setup guide to learn how to enable SSH by adding a file to the /boot directory.SSH (Secure Shell) is a secure protocol widely utilized as the primary method for connecting to your Raspberry Pi. It establishes a text-based interface by creating a remote shell. Once connected, any SSH Raspberry Pi commands you enter in your local terminal are transmitted to the remote Raspberry Pi and executed there—refer to the SunFounder's Linux Bash via SSH tutorial for command examples.
This secure and encrypted protocol, abbreviated as SSH, ensures a safe method for executing commands, implementing changes, and configuring services remotely. When initiating an SSH connection, you log in using an account existing on the remote Raspberry Pi.For a deeper technical explanation of the protocol, see SSH protocol explained by Cloudflare.
Benefices
Efficient Remote Access:
SSH (Secure Shell) provides an efficient means of remotely accessing Raspberry Pi devices without the need for physical presence—SunFounder’s Remote Desktop & SSH overview explores both CLI and GUI access options.
Increased Productivity:
By utilizing SSH, users can access their Raspberry Pi OS from anywhere, allowing for quick and easy completion of administrative tasks. This contributes to significant time savings and increased productivity.
Multitasking Capabilities:
SSH offers features like the ability to connect to multiple Raspberry Pi devices simultaneously, enhancing the efficiency of managing multiple devices.
Batch Command Execution:
SSH allows the execution of commands in batches, providing a convenient way to automate and streamline tasks on the Raspberry Pi.
Security Features:
SSH employs a high level of security through encrypted connections, safeguarding data transferred between local computers and Raspberry Pi devices against unauthorized access. Authentication mechanisms, such as passwords or public keys, add an extra layer of security.
Port Forwarding for Enhanced Security:
The capability of port forwarding in SSH improves security by enabling users to establish secure connections to remote services on the Raspberry Pi without exposing them directly to the Internet, minimizing the risk of potential attacks.For more on tunneling techniques, check the SSH port forwarding guide by SSH.com.
Ease of Configuration:
Configuring SSH for Raspberry Pi is made easier with tools like Raspberry Pi Imager, where SSH can be enabled before the initial boot.
Diverse Client Compatibility:
SSH supports various clients, and in the example provided, Putty for Windows is mentioned. This diversity allows users to choose the SSH client that best suits their preferences and operating system.
Enable SSH
To enable SSH on Raspberry Pi, you’ll first need to ensure SSH is enabled, as it’s disabled by default for security reasons. For security reasons, this feature is disabled by default in Raspberry Pi OS. There are several ways to enable SSH on Raspberry Pi OS, either before its installation or after it,depending on your Raspberry Pi SSH setup preferences.
Installation
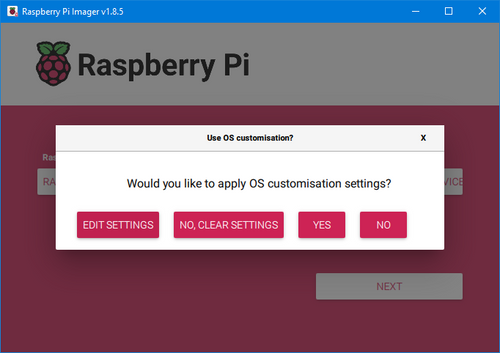
When using Raspberry Pi Imager for Windows, we can enable Enable SSH with SunFounder Imager guide before booting up the device for the first time.
1.Select your Raspberry Pi Device
2.Select your OS version
3.Select your Storage
4.Click on Edite Settings
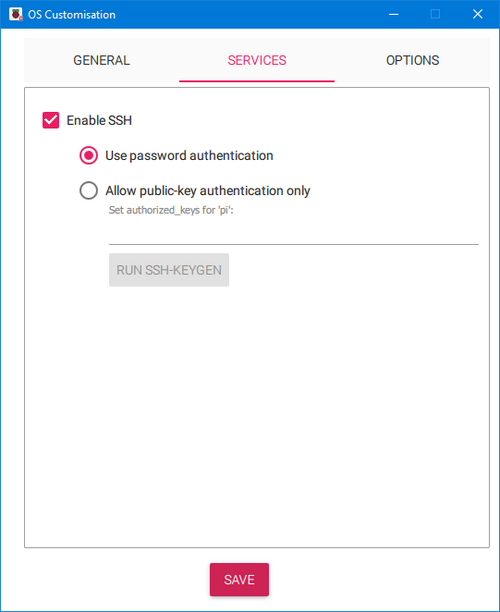
5.Enable SSH with password authentication
6.Save
Terminal
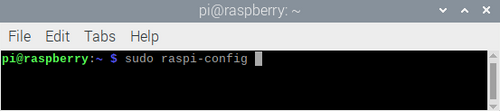
Open the LXTerminal:
1.Run sudo raspi-config
2.Select Interfaces option
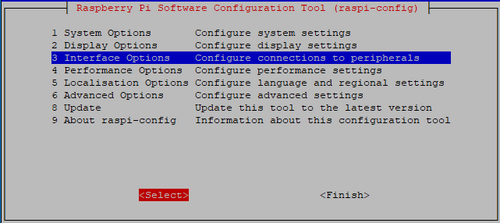
3.Go to I2 SSH
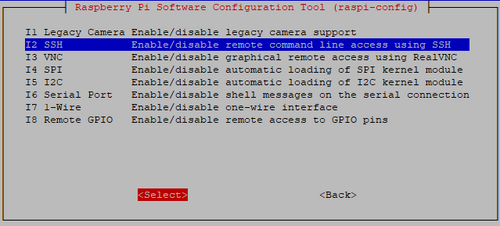
4.Press “yes” to enable SSH and then “finish”

Once the SSH interface is enabled, we can connect to our Raspberry Pi using various SSH clients.Below, we provide an example of how to use Putty SSH with Raspberry Pi to establish a secure connection from a Windows system,as detailed in the SunFounder SSH remote control tutorial.PuTTY is software for text-based terminal sessions. You can Download PuTTY from official site for Windows to initiate SSH connections.The software can be used to establish remote connections via Telnet, Secure Shell, Remote Login and other protocols to a remote station that acts as a server for these protocols and to issue commands via the command line interface.
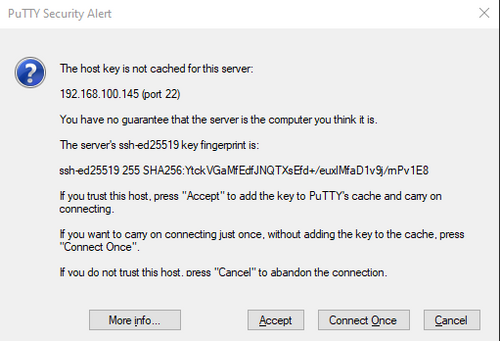
1.Enter the Host Name with your Raspberry Pi's IP address or hostname.

2.Accept the public key
Utilities
Remote monitoring
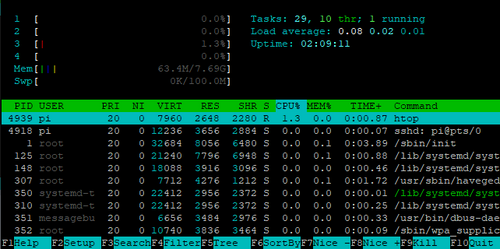
Remote monitoring of a Raspberry Pi using SSH and htop involves accessing the Raspberry Pi remotely via SSH and using the htop command-line utility to monitor system resources in real-time.
htop is an interactive process viewer and system monitor for Unix-like operating systems. It provides a dynamic real-time view of system processes, CPU usage, memory usage, and other system information.
To perform remote monitoring of a Raspberry Pi using SSH and htop, follow these steps:

2.Install htop
(if you already no installed)

3. Run htop

You'll see a color-coded interactive display showing system resource usage.Use htop to monitor various system resources such as CPU usage, memory usage, load average, running processes, and more. You can navigate through the process list, sort processes, and perform actions like killing processes if needed.
Remote file manager
Another utility to use by SSH for managing files on your Raspberry Pi is Midnight Commander.—see the SSH file management tutorial for full installation and usage instructions.With Midnight Commander on Raspberry Pi, users can navigate, edit, and organize files more efficiently via terminal.
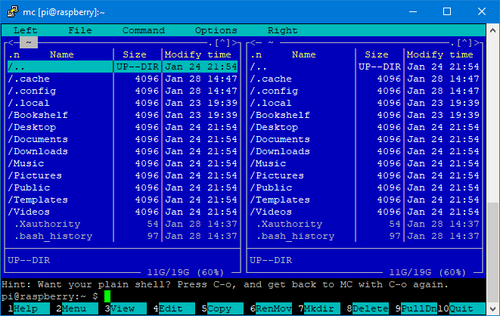
By utilizing SSH and Midnight Commander, you can remotely manage files and perform system tasks on your Raspberry Pi in a convenient and efficient manner, making it particularly useful for headless setups or when accessing the Raspberry Pi from a different location.
Here's how you can set it up and use it:
1. Connect to the Raspberry Pi via SSH

2. Install Midnight Commander (mc):

3. Run Midnight Commander (mc):

This will open the Midnight Commander file manager in the terminal window.
4. Navigate and Manage Files:
Use Midnight Commander to navigate through the file system of the Raspberry Pi, view files and directories, copy, move, delete, and manage files and directories using the built-in file management functions.
5. Perform System Tasks
Midnight Commander also allows you to perform various system tasks such as editing files, searching for files, changing file permissions, creating symbolic links, and more on the Raspberry Pi, all from within the terminal interface.
In summary
SSH on Raspberry Pi not only facilitates remote access but also offers a range of features that contribute to efficient management, security, and ease of use— as highlighted in Unlocking the Power of SSH with Raspberry Pi.


