Ultimate Guide: Craft A Complete Raspberry Pi System Monitor for PC
By Eliot Steele
December 19, 2023
In today's digital world, our personal computers are vital for work, entertainment, and learning. There are times when remote monitoring is essential to ensure optimal performance. This is where the Raspberry Pi PC Performance Monitor becomes invaluable, offering a wireless solution to keep an eye on PC processes and respond swiftly during critical moments.
This project aims to demonstrate how to use a Raspberry Pi to monitor the performance, key processes, and network activity of a Windows PC, helping you keep your PC in top condition. Whether you are a system administrator, a gamer, or an everyday user, this project will provide you with useful tools and methods to ensure that your PC performs at its best at all times.
In the following article, we will provide detailed instructions on how to set up and configure a Raspberry Pi, install remote access tools, choose suitable monitoring tools, and create automated tasks to monitor real-time PC performance metrics of interest. We will also discuss how to remotely access and control a Windows PC using the Raspberry Pi System for PC Performance Monitoring and how to set up notifications to stay informed about critical events.
PC monitoring not only enhances productivity but also helps you promptly identify and address potential issues, ensuring your system's optimal performance. Whether you are a novice or an experienced tech enthusiast, this project will equip you with valuable knowledge and tools to build your own PC monitoring system. Let's get started!
Why Create a DIY PC Status Monitoring Device?
There are several benefits to creating a DIY PC status monitoring device that can help you better understand and manage your personal computer's performance and status. Here are some advantages of building a DIY PC status monitoring device:
- Adaptation to Personal Needs: You can customize the monitoring device to suit your specific requirements, including monitoring specific applications, system resources, network traffic, and more.
- Personalized Customization: You can customize the features and appearance of the monitoring device according to your preferences and needs. This means you can create a system that fits your requirements perfectly.
- Remote Monitoring: DIY devices typically offer remote monitoring capabilities, allowing you to access your PC's performance and status anytime, anywhere.
- Custom Alerts and Notifications: You can set up custom alerts and notifications to receive timely alerts when there are issues with your PC's performance. This helps you take action promptly to prevent potential problems.
- More Control: Having a homemade device means you have full control and can freely choose and modify monitoring parameters and functions.
- Flexibility and Scalability: DIY devices often offer greater flexibility and scalability, allowing you to add additional sensors, integrate other automation devices, or implement custom notifications and actions.
Why Use Raspberry Pi to Build a DIY PC Status Monitor?
Using a Raspberry Pi as a PC System Monitor offers several advantages :
- Cost-Effectiveness: Raspberry Pi is an affordable small computer, making it cost-effective for DIY projects. Compared to purchasing specialized PC monitoring hardware, using a Raspberry Pi can save a significant amount of money.
- Flexibility: Raspberry Pi is an open platform, allowing users to freely choose and customize software and hardware components to meet their specific needs. This makes Raspberry Pi an ideal choice for building a personalized PC monitor.
- Compact and Portable: Raspberry Pi is compact in size and easy to install and carry. You can place the Raspberry Pi anywhere for wireless PC monitoring without taking up much space.
- Low Power Consumption: Raspberry Pi has relatively low power consumption, allowing it to run for extended periods without significantly increasing electricity costs. This makes it ideal for continuous PC performance monitoring.
- Community Support: Raspberry Pi has a large community of users and ample documentation and tutorials available for reference. You can easily find solutions to problems and share experiences with other Raspberry Pi users.
- Scalability: Using Raspberry Pi, you can easily expand functionality, such as adding more sensors, integrating other automation devices, or implementing custom notifications and actions.
- Educational Opportunities: Raspberry Pi serves as an educational tool, and by building a PC monitoring project, you can learn about various aspects of computer hardware, software, automation, and networking.
What You Need to Prepare?
You will need the following basic items and materials to set up your Raspberry Pi performance monitor:
- Raspberry Pi: Raspberry Pi is the primary hardware platform, and you can choose a model that suits your needs, such as Raspberry Pi 3, Raspberry Pi 4, etc.
- Power Adapter: Provide a stable power supply for the Raspberry Pi, typically using a 5V power adapter.
- MicroSD Card: Use it to store the Raspberry Pi's operating system. It is recommended to use an 8GB or larger capacity SD card.
- Keyboard and Mouse: Needed for initial Raspberry Pi setup.
- Computer or Laptop: Required for configuring the Raspberry Pi during the initial setup.
- HDMI Display: Used to connect to the Raspberry Pi for initial setup.
- Network Connection: You will need a reliable network connection, which can be Wi-Fi or Ethernet.
- Sensors and Modules (Optional): Depending on your monitoring needs, you may require various sensors such as temperature sensors, humidity sensors, motion sensors, etc.
- Enclosure or Case (Optional): Provides protection for the Raspberry Pi and related circuits to ensure device safety.


Download and Install Required Software:
1. To set up your Raspberry Pi hardware monitor. We need to access the Mobro website (https://mobro.app/) and download and install the Mobro APP.

Once installed, open Mobro, but you don't need to operate it for now; just keep it running.
2. Download the MoBro Raspbian image from the MoBro official website and extract it.

3. Download the Raspberry Pi Imager from the Raspberry Pi official website (https://www.raspberrypi.com/software/).
4. Launch the Raspberry Pi Imager, click "Choose OS," select "Use Custom," and write the MoBro Raspbian image to the MicroSD card.

5. DO NOT apply OS customisation settings.

6. After the write process is complete, insert the SD card into the Raspberry Pi.
Setting Up Mobro for Raspberry Pi:
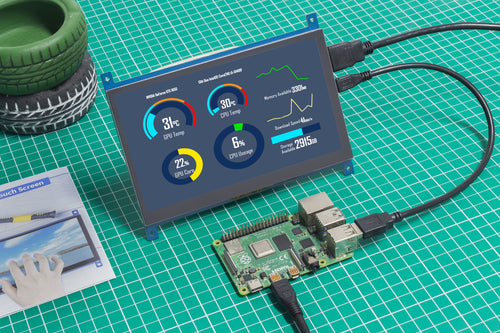
After powering on your Raspberry Pi, connect it to your network for setting up the Raspberry Pi system monitor web interface. If using Wi-Fi, the Raspberry Pi will create a 'MoBro_Configuration' access point for network setup. Once configured and connected to your Wi-Fi, the Raspberry Pi will locate the MoBro instance on your PC within the same network, enabling web-based monitoring of your PC.
1. Connect a screen to the Raspberry Pi and power it on.
2. If you've connected the Raspberry Pi to your network using an Ethernet cable (ensure it's on the same network as the PC you want to monitor), the setup process is straightforward; you'll just need to wait for a moment.
3. If you intend to use Wi-Fi for your Raspberry Pi:
a) After a short while, the Raspberry Pi will create a wireless access point named "MoBro_Configuration." You will enter essential information like your SSID and password for your Wi-Fi network here.

b) Connect your PC or smartphone to this network and access 192.168.4.1 in a web browser to enter the MoBro Raspbian configuration page. Follow the setup wizard to configure your location, wireless network (SSID and password), time zone, and other settings.

c) After completing and applying the configuration, the Raspberry Pi will restart and automatically connect to your Wi-Fi network. It will then search for the MoBro instance running on your PC within the same network.

Edit the User Interface (UI):
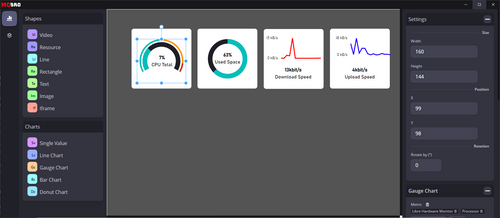
Once the Mobro Raspberry Pi is connected to your PC, a new dashboard will appear in the MoBro app on your PC. Now it's time to customize it.

1. Here, you can drag and drop shapes widgets from the left panel to design the UI interface and drag and drop charts widgets to read and display various PC parameters.

2. After dragging, click on each widget to configure it. You can customize settings such as font, size, color, position, rotation, custom themes, and more.
3. The most crucial step is to select the appropriate monitoring data for each chart's metric category. By default, you will have two data sources: Libre Hardware Monitor and MoBro Hardware Monitor. Choose one that suits your needs.

4. The interface you design on your PC will be synchronized and displayed on the Raspberry Pi's screen.
5. The interface you design on your PC will be synchronized and displayed on the Raspberry Pi's screen.
User feedback
One of our regular SunFounder community users, Emada, gave us feedback saying, "I recently started using the Raspberry Pi as my PC system monitor and the results have exceeded my expectations. The installation and configuration process was very simple with detailed guidelines to follow. Not only does it help me to monitor my PC performance in real time, but it also allows me to deal with issues remotely, which is a huge improvement to my workflow.I am very impressed with the flexibility and power of the Raspberry Pi. Highly recommended for tech enthusiasts looking for a cost-effective DIY monitoring solution!"
Conclusion
Raspberry system monitor is a versatile and powerful tool that enhances performance and enables remote monitoring, tailored to meet individual needs. It's a cost-effective, flexible solution that leverages the Raspberry Pi's compact size and low power consumption. This project is not only practical for various users, from system administrators to gamers, but also offers educational value, providing insights into computer hardware, software, and networking. By incorporating the Raspberry Pi into PC monitoring, users gain a deeper understanding and control over their computer systems, making it an invaluable asset for efficient and effective PC management.


